![You suck at protoshop. No, you [i]really[/i] oo.](http://blog.gg8.se/images/you-suck-at-photoshop-you-really-do-your-awful.png)


nitro2k01’s SGB Enabler for EZ Flash Jr
August 19th, 2021EZ Flash Jr is an SD card based flash cartridge for the Gameboy and Gameboy Color. While economical, there’s one feature that has been missing from it, namely good support for SGB (Super Gameboy). You can sometimes get it to work by hitting the reset button at exactly the right time, but even then any SGB enabled game would lack any SGB enhancements, like custom borders. The SGB Enabler is a modified version of EZ Flash Jr Kernel 1.04e which mostly solves these problems.
This is a beta version - feedback appreciated. Especially from people using a NTSC SNES or a SGB2.
What was the problem and how does the SGB Enabler work?
The SGB contains a full Gameboy CPU and the SNES is used to show the graphics and sound from the Gameboy. But before the SNES allows an image to be shown, it needs a message from the Gameboy to validate the cartridge. Unfortunately, EZ Flash Jr holds the CPU in reset (basically locks it up) while it’s loading its own firmware. Because of this, the timing is thrown off. The SNES never gets the message and only shows a black screen forever.
But the Gameboy CPU is still running in the background. The SGB Enabler sends the same commands as the Gameboy boot ROM would normally send, and the SNES allows an an image to be shown.
How do you use the SGB Enabler?
Simply copy the included ezgb.dat file to the root of the SD card, overwriting the existing file. Then start the Super Gameboy. (download link at the bottom of the page.) You do not need to touch the reset button on either the cartridge or SNES. It just works.
Does the SGB Enabler restore all SGB functions?
Yes, it enables the game to use colorization and border graphics, and even special sound effects in the few games that use those. And Space Invaders 94’s SNES arcade mode works as well.
Is the SGB Enabler safe to use?
Yes. The SGB Enabler only modifies the kernel (menu), and doesn’t touch the firmware (FPGA). Therefore, you can simply restore it to its original state by copying the original ezgb.dat file from EZ Flash Team onto the SD card, and there’s no risk of bricking. You do not need to upgrade to FW5 (which Team EZ Flash removed). It’s recommended to use FW4.
Can I still use the SGB Enabler on a DMG/GBC?
Yes, the only downside is that the boot time is longer because it always tries to send the commands to wake up the SGB as explained above. I will try to figure out a way to fix this later, but this is just an early beta version to get feedback from users. If this is a problem, simply replace ezgb.dat with the original file from EZ Flash. (Detecting the hardware is not as straightforward as it seems because the EZ Flash Jr has an internal boot ROM that erases the initial registers that programmers normally use to detect which type of hardware the game is running on.)
Does the SGB Enabler work on both PAL and NTSC Super Gameboys?
I only have a PAL SNES, but I’ve region modded it so I can select PAL or NTSC. In my testing, I’ve made sure the SGB Enabler works in both PAL and NTSC mode, but feedback from someone who has a real NTSC SGB would be appreciated.
The SNES reset button doesn’t work!
Please use the reset button on the cartridge, or power cycle the SNES to restart.
Download
Pushpin modded for Arduinoboy/nanoloop MIDI
November 14th, 2016Get it here.
Pushpin modded for Arduinoboy/nanoloop MIDI

===========================================

This is a version of Pushpin which has been modded to use the regular link port

protocol instead of Pushpin’s original hack of reading MIDI UART directly on a

digital IO pin on the GBC link port. This version works with Arduinoboy in mGB

mode or the nanoloop MIDI adapter in MIDI mode. This version no longer works

with Pushpin’s original MIDI UART mode.
It has been modified to be able to run on non-GBC Gameboys, since Pushpin hangs
when it tries to switch to GBC double speed mode. The display is slightly
glitched on monochrome Gameboy but otherwise it should work fine.
This version works just like the original. Press up/down to select MIDI channel
assignment, then press start to begin receiving MIDI. Refer to Pushpin’s manual
for advanced usage and MIDI CC assignment.
Since I don’t have a GBDK environment set up, it was easier for me to do this
by modifying the ROM using BGB. For this reason there’s currently no source
code. I should probably make a proper release source code at some point. Such
a version could offer a mode selection at boot time to allow either MIDI UART
mode or SPI mode.
nitro2k01 - 2016-11-14
http://blog.gg8.se/wordpress/
Pushpin documentation and source code:
https://github.com/bwhitman/pushpin
Gameboy Art by Tom Markey
November 24th, 2008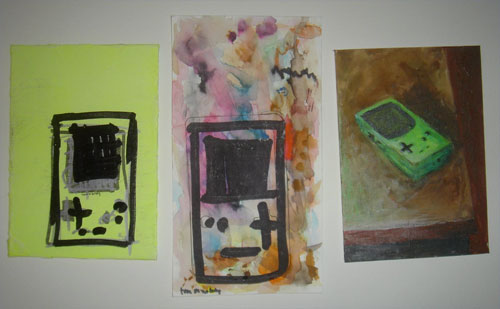
Tom Markey
Gameboys.
I wouldn’t exactly call it a series yet. More of just tests or samples, but i can’t stop doing work involving them so maybe very large series on the way?
Drawings. Other artsy lo-fi stuff. That’s what Tom Markey is doing. And some LSDj tunes. Go check it out.
10% discount on Gameboy gear from Nonfinite Electronics
November 11th, 2008![]()
Nonfinite Electronics recently teamed up with CrunchyCo, an independent group of inspired individuals who are into lo-fi music and arts. To celebrate this, Nonfinite is offering a 10% discount on all of his products. (He has everything from Prosounded backlit Gameboys to Gameboy flash cartridges in his shop.)
But hurry, the discount is only valid for two weeks from now! The coupon code for the discount is available at www.crunchyco.com.
Eight great ways to sync your boys
October 10th, 2008Sebastian Tomczak of GameboyAustralia and Milkcrate has posted a guide comparing eight ways of synchronizing Gameboys running LSDj and Nanoloop to each other and other gear for music production.
The sexiest thing ever! (255 Gameboys)
August 28th, 2008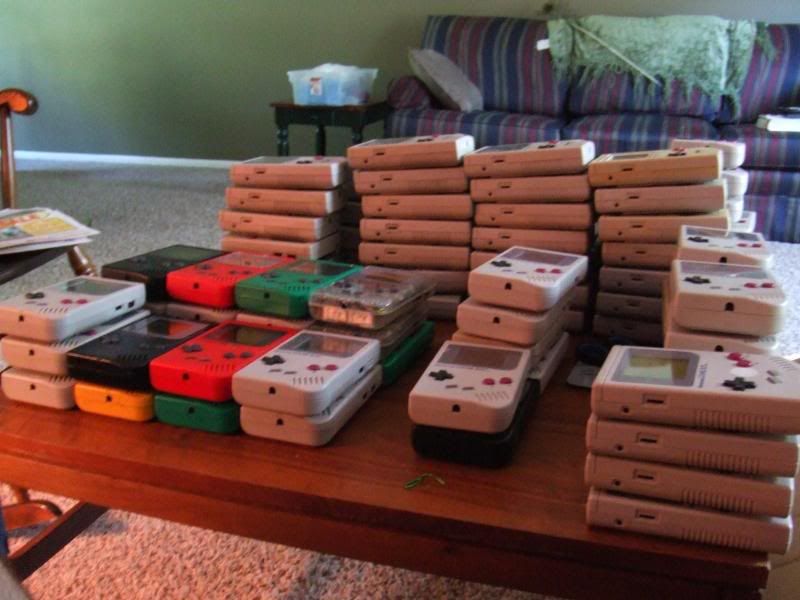


Look at that! 0xFF (Hexadecimal for 255) pieces of DMG-01. Could there be anything sexier that that? The number is just right too. 255 is the largest number that can fit into an 8-bit CPU register, making the number completely ideal. Look at the top picture and you’ll see that most of them are traditional gray-boys while a couple have other colours, and exactly two of them are transparent. (Goose-bumps starting to grow)
Also notice in the bottom picture that one of them looks pale yellow. Don’t be fooled by the crappy camera shot! That’s is in fact one of the ultra rare white DMG’s, supposedly only sold in Japan.
The catch? Unfortunately they’re not mine, but Nonfinite’s. He bought them wholesale from what appars to be the last wholesale reseller in the US. (But if you know of more people doing Gameboy wholesales, feel free to contact me)
Knowing Nonfinite, he will mod the Gameboys and sell in his shop. Yup, painstakingly go through each and every one of them, fix them where needed, put in backlight and ProSound mods, finish them off by painting the case in the most awesome ways, so they’re ready to be shipped to enthusiasts all over the world.
And even if you already have a Gameboy, he sells flash cartridges for Little Sound Dj (Music software for Gameboy) too.
Back from NorbergFestival 2008 (Video and image dump)
July 28th, 2008
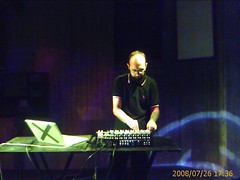
Left: Foona, (Roots dub) Right: Ayhan Aydin (Illbient)
I’m back from the Norberg Festival, and I had a great time. A shout out to some of the great artists: nordloef, Foona, Dj Peter Ericsson, Bitmobilen, PH1 Axid Cerw, all of the X-Dumpians, Veqtor, AWT, Food for Animals, Ayhan Aydin and to finish off the perfect Saturday evening, some breakcore from Babyshaker and Bong-Ra.
Below is a video of my own gig. More snippets available in this Youtube playlist.
LDL by nitro2k01 (Me) Nevermind the inrt2o0k bollocks!
This brings me to another point. You might be wondering why I’m not using any Gameboys or anything on stage in those videos. Here’s the story: About two weeks before an SD card in my M3DS crashed. (I’m using the Lameboy emulator for the DS - actually pretty handy and pretty clean sound as well.) Because of this, 6 months worth of work went down the drain in an instant. I trusted an SD card to be a stable form of storage and didn’t even have a backup. (Gah!!)
So, I had to rush together a live set, using only pre-recorded material. I could’ve brought a real DMG and played some of my old stuff, but I figured I’d better just use my computer for everything this time.
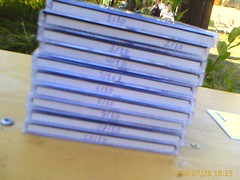
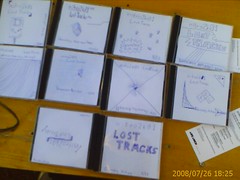
Because of the data crash, I collected all the songs that I had actually recorded before the crash and made 10 CD’s that I sold on the festival. Each with a limited edition number and a hand drawn CD cover. The CD is called “Lost Tracks” due to the fact the source files for the tracks on it were lost. I wish to thank all of the people who bought a copy! I’m planning to release these songs as a free net release on OXO Unlimited, but if you’re interested in buying a physical copy with a hand drawn cover, don’t hesitate to contact me.
I’m going to use the small profit I made from it to buy a WiiMote. My plan for the future is to pre-record a number of loops and play around with on the fly using a combo of Ableton Live and Reaktor.

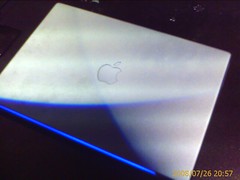
Left: Acid Balloon at camp303 Right: Veqtor’s Mac
Gameboy Development forum launched!
February 23rd, 2008For those who are interested in it, I have now started a Gameboy development forum for the old-school Gameboys (Monochrome versions and GBC)
it can be found right here: http://gbdev.gg8.se/forums/index.php
How to build a MIDI interface for Pushpin
November 28th, 2007This is a guide inspired by and loosely based on this Pushpin guide. However, there are a couple of things that I’d like to remark on, and one thing that is actually plain wrong.
Update: I built and tested my interface, and it didn’t work out as I wanted it to. I will do more thorough troubleshooting in a few days. You can read the full build report here.
If you bought the components listed below, you may want to wait a little for further instructions before you build it. Some things may be wrong in that schematic (Most probably resistor values.)
Update 2: I’ve made a new schematic based on a working device built by Bill Byrne/PLI. You can see how it looks here: http://www.billbyrne.net/pushpinworks.jpg
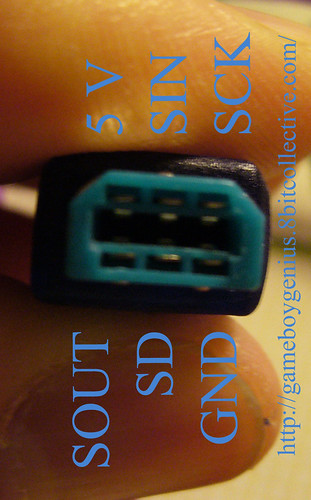
Finding the right link cable
First you need a link cable to use for the interface. There are special requirements for the cable. It has to have cables for all six of the pins, and it has to fit the Gameboy Color link socket. This means that neither a big plug, as used for DMG’s (Grey Gameboys) or a GBA only plug with an extra piece of plastic, can be used.
What this means in terms of finding the right cable, is that it’s a bit of a gamble to find the right one. One thing is for sure though: Stay away from Nintendo’s official Gamelink cables. They’re guaranteed not to have wires to all 6 pins. Look for a 3rd party cable instead. Some cables are sold as GBA cables but can in fact in fact be plugged into a GBC socket.
The picture farther down shows a working cable with pinouts. Ans easy way to tell that a cable is not working, is if there’s no connector for the 5 V and SD pins.
If you find a source for working cables, please leave a comment!
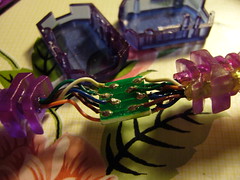
Getting access to the wires in the cable
You can just cut the cable in the middle if you want to, but my cable also has a little plastic box where the cable is split three ways, two GBC plugs, and one DMG plug. I will try to re-use for the circuit, if I can get it small enogh to fit into it.
The best way to open a little box like this one is to force something sharp, like scalpel between the two pieces and force them apart. I don’t have scalpel, so the next to best option for me use a screwdriver. I couldn’t fit it in the gap, so instead I applied quite large amount of pressure in the center of it, which made the pieces come apart, at the expense of a small piece of plastic. However, this piece wasn’t critical and I can still put the pieces together.
Tracing the wires in the cable
The other guide that I linked to in the beginning of the document, says you can find the +5 V line by probing different lines and looking for a 5 V difference. Unfortunately, this is plain wrong. In fact, when checking with a voltmeter, all pins are 5 V relative the ground. The reason for this is that every input pin has a pull up resistor, and the SOUT (Signal out) line has a default value of 1, even when Pushpin has been started.
A more accurate way of tracing the wires is to set your multimeter to diode mode. This mode lets you test for circuits. If you put the probes at two places that are connected to each other, it will give an indication. Most multimeters will even beep when you have a circuit. Put it in diode mode and short the probes against each other to see if this is true for yours.
Then put one of the probes to the pin you want to test, and poke around with other one to try to find the corresponding cable. Take notes of the colors of the cables and which pin they correspond to. Double check if needed.
The pins of interest for the MIDI interface are 5 V, SD and Gnd.
Schematic and parts list for the conversion circuit
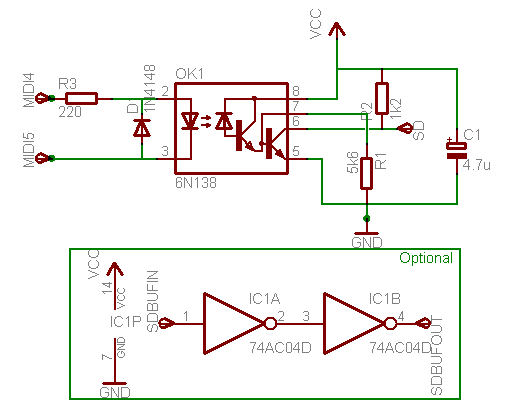
Schematic update January 16: The resistor values are changed to match Bill Byrne’s values.
The capacitor value is slightly increased as well. This is only a recommendation. 4.7 µF should be seen as a minimum value.
There’s also a new, optional, circuit which is an inverter circuit that works as a buffer. It should be more stable, however Bill’s device worked without it. Perhaps the resistor values need to be updated if you’re using the buffer. If you don’t want to use it, connect SD in the schematic to the cable leading to the SD pin on the cable. If you want to use it, connect SD in the schematic to SDBUFIN and connect SDBUFOUT to the SD pin. Ignore the weird “74AC04D” value in the schematic. The correct value is 74hc04 (Or a variant thereof)
To clear up any possible confusion about the R3 resistor: It should be a 220 Ohm, not a 200 kOhm resistor. 200 kOhm is far too big and will completely block the signal.
Part list:
| Pcs | What? | Value | Digikey# |
| 1 | Opto-coupler | 6N138 | 6N138QT-ND |
| 1 | Hex inverter | 74HC04 | — |
| 1 | Diode | 1N4148 | 1N4148FS-ND |
| 1 | Resistor | 220 Ohm | P220CACT-ND |
| 1 | Resistor | 1.2 kOhm | — |
| 1 | Resistor | 5.6 kOhm | — |
| 1 | Capacitor | 4.7 µF (Guideline) | — |
Update January 16: I’m dropping the Digiky numbers for new components.
A little disclaimer here. I haven’t yet built this circuit. (I only learned about it today, November 27, and I don’t have all the parts at hand) And I certainly haven’t bought anything from Digikey. But according to the best of my electronic knowledge, the circuit, as outlined above, should work just fine, and the Digikey links are my recommendations from what I can read in their descriptions. I do however not give any total guarantees that I’m right until I’ve built the circuit myself.
And likewise, until I get a chance to build it, you’ll have to interpret the schematic yourself. You might want to buy some prototype PCB’s, “Veroboard”.
Gameboy music how-to
July 23rd, 2007Pour les Francophones il y a aussi un article sur la musique Gameboy (Et des autres consoles de jeu) ici, écrit par Bobby Sixkilla.
This is a guide that I’m compiling to help people get started with Gameboy music and get an overview of some of the tools that exist for Gameboy music making. This page is inspired by this C64 music guide by GOTO80.
This page is and will always be work in progress, as some information gets old after a while. If you feel that some information is inaccurate, outdated or if something is missing, leave a comment, and I’ll fix it.
Why Gameboy music? You might like the raw, (It’s raw because of the lack of any hardware filtering) digital sound that comes out from the little box, but the biggest advantage is perhaps that it’s pocket-sized, so you can bring it everywhere. Don’t be ashamed to track a tune on the bus or on the beach. (Thanks Rabato for the pic!) I know I’m not!
Software
Although there are other programs such as Carillon and Paragon5 tracker, the preferred tools Gameboy musicians today are Little Sound Dj (LSDj) and Nanoloop. That is so because Carillon and P5tracker focus on playback in games/demos, whereas LSDj and Nanoloop focuses on live/studio playback.
There are some simpler and less known programs, like pounder, stepgirl and pixelh8 music tech, which are covered below.
Both Little Sound Dj and Nanoloop are available as demo version ROMs, see their respective pages for details.
Little Sound Dj
Little Sound Dj and Nanoloop differ in the construction of the programs. Little Sound Dj is a so called tracker which means that the interface consists of a number of rows where you can enter note data and effects commands, which is then played back from top to bottom. Some people find this system confusing, but it’s quite easy when you get the hang of it. To name a few other features, LSDj can play samples, has a subtractive synth (Technically it’s actually an additive synth) and has advanced table functionality.
The samples included in LSDj are mainly drums from drum machines in the standard version, but you can add any sample you wish with a special application.
LSDj cartridges are no longer being produced, and there are no plans to start the production again. Instead you can buy a license for the ROM image, which you can use in an emulator or burn to flash cartridge. (See below for information about both things)
Little Sond Dj cam be obtained from the official home page for a donation of US$1 and up ($10 or more recommended if you wih to support Johan and keep the development of the application alive)
Nanoloop
Nanoloop on the other hand has an interface which is probably less powerful but a lot more intuitive. Nanoloop is a step sequencer in 16 steps, organized in a cube. Notes and effects are entered by moving little boxes.
As far as I know, nanoloop was originally developed as an experiment about user interfaces and usability about software. In Nanoloop, everything is graphical, as opposed to LSDj’s very text/number-influenced interface. Although LSDj is considered generally more powerful and versatile than Nanoloop, Nanoloop can make some interesting stuff due its unique FM and subtractive synth algorithms.
There are two major versions of Nanoloop, 1.x for older Gameboys, and 2.x for the Gameboy Advance generation hardware. Both have a similar user interface, but differ somewhat because of different hardware capabilities.
Nanoloop is only being on a cartridge, and the ROM is not for sale. Right now the cartridges are sold out, but rumour has it that Nanoloop will be for sale again at the end of July. Keep an eye on their shop, if you’re interested in Nanoloop.
Of course you can look for used cartridges on ebay.
Other software

There a few other interesting, but often forgotten pieces of free Gameboy music software.
8cylinder has made a few interesting pieces of software, like Sludgeon, a step sequencer, and Pounder! a crazy live drum performance program.
I also like Stepgirl and Muddy GB which are two similar programs that let you play the Gameboy truly live, by doing chord scales. Here’s a cool video of karawapo using MuddyGB, so you can get an idea of how it works.
A simple but nice program in this category is also Electric Drum by Aleksi Eeben. (Click download, then find the file electridrum.zip in that archive) It’s a simple but nice live drum machine using the Gameboy’s sound chip to produce the sound. (As opposed to using sampled drums)
The last program I’ll mention isn’t free, as opposed to the other software in this category. It’s called PixelH8 music tech and is a synthesizer that you play using the Gameboy’s keys. It’s being sold as a ROM image, and soon cartidges will be offered as well. You can watch a demo of it on youtube or buy the ROM/reserve a cartridge. (Where you can also try the program online)
The easy/lame way: Emulation on your PC
If you feel that don’t want to go through the hassle of getting a flash cartridge, or you just want to try things out, you can try running the Gameboy software in an emulator. The big disadvantage with emulation is the sound. Most emulators won’t emulate the sound properly. Most notably some emulators will remove the unique character of the GB’s noise channel.
Two emulators that are known to work pretty well with LSDj are VisualBoy Advance and BGB. BGB also has debugging functions in the style of no$gmb, for those who need it, but without the limitations and inaccuracies of no$gmb.
The hard/bad way: Emulation on handhelds
Emulation is not just for your PC. In some cases it can also be a suitable solution for incompatible handhelds. There are emulators for consoles such as the GBA, the NDS, the PSP and the GP.
Gameboy emulation on the GBA is not too good, but necessary if you want to run the software on GBA micro or NDS. (These machines can not run classic Gameboy software natively, but require an emulator)
Emulation on handhelds is not my area of expertise, but here are some links and advice I’ve collected:
- Gamepark: There are at least two emulators for the GP platforms as far as I know. These are GPGB and fGB32. According to the vague memory of stage7 fGB32 and maybe GPGB, are having problems with sample playback (silence) and portamento.
- Gameboy Advance: Goomba seems to be the emulator of choice for this platform. It has some problems with timing and also has the same distorsion problems for sample playback as when running LSDj natively on a GBA.
- Playstation Portable: rin. Don’t know much about it except that LSDj reportedly runs well on it.
- Nintendo DS: Lameboy DS. Same here, don’t know much about it.
If you know more than about the subject, or if I’m wrong about something, please feel free to correct me or add information. This section is very incomplete for now.
The hard/good way: Flash cartridges
The coolest way to do GB music is without doubt on an actual Gameboy, and the best way of doing that is with a Gameboy flash cartridge. (Except in the cases of Nanoloop and pixelh8 musictech, these programs are sold on cartridges already)
There are several brands of so called backup systems around, and here’s a quick overview of some of them:
- For sale! GB transferer: This is the recommended system as of today. It’s being sold by several online shops, and works well with LSDj and other music software.
These shops are known to sell the Gameboy Transferer and cartridges:
Rob Webb’s shop (UK) Rob Webb has been around forever and has a good reputation.
Nonfinite’s shop (US) Nonfinite has been selling custom painted Gameboys for some time now and has recently begun selling backup gear as well. Feedback thread for Nonfinite on 8bc.
Kitsch-Bent’s shop (US) Kitsch-Bent is a new kid on the block, but has got good feedback on 8bc so far. Feedback thread for Kitsch-Bent on 8bc.
HKEMS (Hong Kong) HKEMS sells transferers, and are also known to accept bulk orders for cartridges. However, keep in mind that HKEMS prefers bank wire transfers, and your bank may potentially charge you a very high fee for the money transfer to Hong Kong. So please check that before ordering.All in all I recommend everyone to compare the available shops, taking combo discounts, mass order discounts, shipping, possible import taxes and bank fees into account.
It is also a good idea to post feedback, negative or positive, in the feedback forum on 8bitcollective, to help others. - Bung Xchanger: This is seen by many people as the ultimate backup system, but unfortunately Bung is long since dead because of a lawsuit, and this system is hard to find.
- PC Linker: This cartridge type works with LSDj, but does not have support for the file saving functions. It’s probably not sold new any longer.
- José Torres’ USB cartridge: This one is still work in progress, but it looks promising. When it’s done, it’ll be backup cartridge for Gameboy classic/color with USB support for easy upload. I’ll definitely keep an eye on it and see how it progresses.
Gameboys
Choosing the right hardware is essential for getting the sound that you want. Although you may not think so, different models vary vastly in terms of sound quality and noise. And even for the same model, sound can vary alot between units. For example I have two DMG’s (The big, usually gray one) of which one has a really low output, that I almost can’t hear, and the other has such a loud output that it almost hurts my ears when using headphones.
In my opinion, DMG is the preferred model. (Warm, loud sound) Second is GBA which has a bit sharper sound, and also a bit more bass, but has a bug concerning the playback of wave samples. Gameboy Color (GBC) should generally be avoided, unless ProSound modified.
For a more scientific approach, please see Herbert Weixelbaum’s Gameboy sound comparison page, which thoroughly compares all known Gameboy models, and also shows the waveform that each model outputs.
It’s a recommended read if you’re serious about choosing the right model.
One step further: mods and external hardware
Section about mods and gadgets. (Coming soon!)