![You suck at protoshop. No, you [i]really[/i] oo.](http://blog.gg8.se/images/you-suck-at-photoshop-you-really-do-your-awful.png)


Monotribe, MIDI and me
August 14th, 2011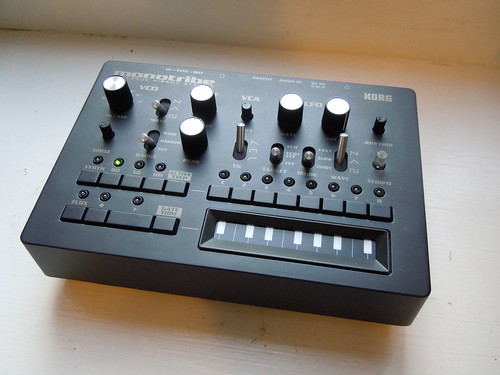
Introduction
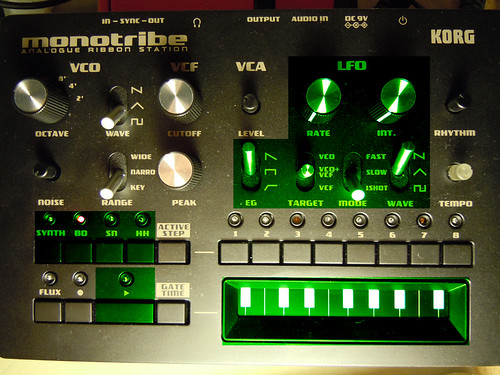
Voilà Korg monotribe, the successor to its little brother, the monotron. The Monotron is a cheap, squeeky, and easily moddable toy synth with an MS-10/20-like filter topology. It has a ribbon keyboard an audio oscillator, an LFO, a lowpass filter, and not much more. The monotron was an instant hit, and Korg released schematics for it to aid modders further.
When I heard about the monotribe, I had my doubts. Mostly that there’s only one pattern, which is 8 steps long. Well, there are 8 extra steps for the drums, as well as a “flux mode” which records your movements on the ribbon continuously. In that sense, it is limited, and is an instrument made to be played with your hands, rather than be programmed. But as it turned out, this was a design choice, and not a technical limitation. I can easily imagine why. They wanted it to seem as analog and playful as possible.
Same thing with MIDI. Officially, the monotribe doesn’t support MIDI. It does however offer a sync pulse output and input. This allows it to be synced to other monotribes, modular synthesizers or even Korg’s own virtual iMS-20/iElectribe, using a special sync app on a second iPhone/Pod/Pad. However, the lack of MIDI is still a slight limitation.
TOC
Opening it up
Hackability and MIDI
MIDI, the electrical side of things
MIDI, the mechanical side of things
What can you do with MIDI on the monotribe?
Videos
Where do we go from here?/Final thoughts
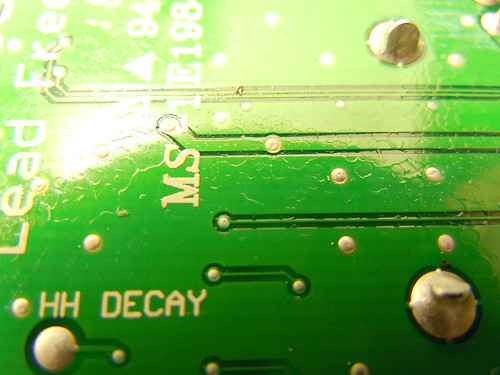
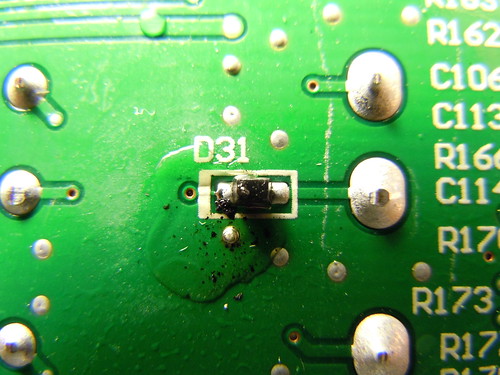
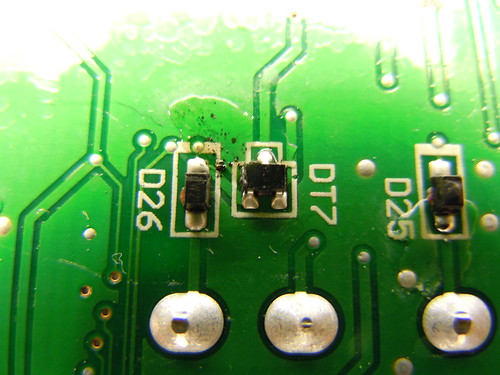
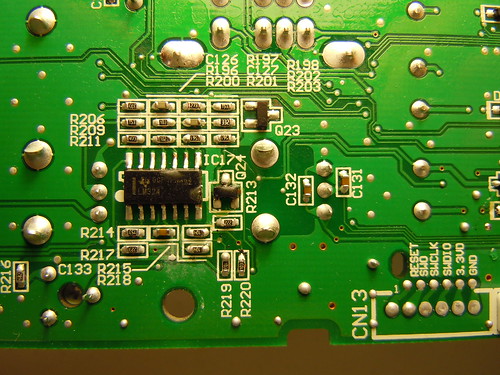
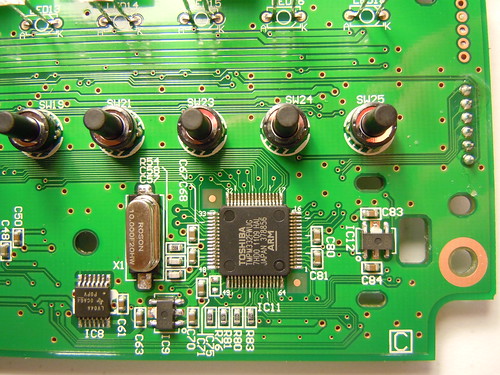
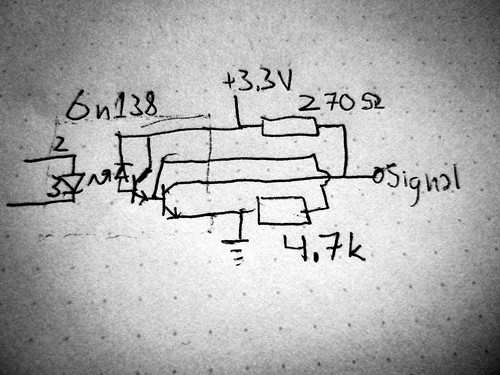
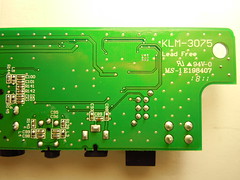
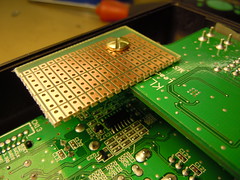
Before I get to the part everyone has been waiting for, let me remark on something I noticed when I opened up the monotribe. The whole bottom side of the main board is covered in some form of residue, maybe flux or one of the liquids used in the manufacturing process. This is even nastier. In the top two pictures, there’s some black stuff that I’m not sure what it is. Could be corrosion of some kind, or parts of a chip that was crushed by the pick and place machine. Or something. In the bottom picture, notice how IC17 (an LM324 opamp) as well as the Q2 transistor, are covered in this gunk. Also notice that there’s too much solder on some of the SMD resistors. (Original hi-res photo, 4320 x 3240) None of that is an immediate risk to the function of the device, but depending on what that residue actually is, there’s a very real risk of an increased failure rate over a decade or three, due to corrosion. I’ve seen better soldering, and I’ve seen significantly worse soldering, but all-in-all I expect better from a factory-made product. Maybe mine was a dud, but it makes you wonder. I doubt Korg is going to release a schematic for the monotribe anytime soon, like they did for the monotron, but the monotribe board does have a number of useful points for modifying parameters and separating outputs, marked on the board. See the Monomodder blog for inspiration. However, monotribe is quite a different beast compared to monotron. Even though the sounds are generated with analog circuitry, the heart of the monotribe is a microcontroller. The microcontroller is used as sequencer and, I think, LFO. The microcontroller is a Toshiba TMPM332FWUG. It has an ARM Cortex-M3 core, 128 kB of flash memory and 8 kB of internal RAM. It is clocked at 10 MHz. It has, like most microcontrollers these days, support for UART (serial communication) which means that software running on the microcontroller could theoretically easily implement MIDI, which is really just a quirky variation of UART. As I, and air_variable (Japanese) before me have discovered, there is something going on there, and it turned out to be actual MIDI. All you need to do is hook a few points on the board. Note that this schematic is looking at the back of a panel mount style MIDI jack, similar to the one seen in my other images. The schematic is drawn so that you’re looking at the chip from above. Place the chip so that the little notch is pointing up. Pins 2 and 3 are on the left side of the chip. Ground is the bottom right pin. +5V/+3.3V is the upper right pin on the chip. The things inside the dotted rectangle is what’s inside the chip. The unspecified diode on the left of the chip is a small signal diode, not a LED. 1n4148 or 1n914 will work, for example. MIDI is designed in such a way that individual bits are transferred as a current that lights up a LED in an optocoupler, on the receiving side. This LED, in turn turns a phototransistor on and off. In a MIDI circuit, the LED in the optocoupler should be connected between the +5V line and the signal line. Normally, the signal line is high, which means there is no difference between it and the +5V line. To communicate, the signal line will go low, which in turn will light the LED on the receiving side. A MIDI circuit should have a number of resistors both on the transmitting and receiving side. This design gives MIDI better noise immunity, and protects the gear in case of a number of things that can go wrong, such as a short-circuit between any individual pins, connecting an output to an output or reversing the pinout of the plug. Let’s first look at how to do MIDI out with the monotribe. The microcontroller is using a 3.3 V power supply. MIDI is normally using 5 V, so if we wanted to be correct, we would convert the signal from 3.3 V to 5 V. However, we don’t strictly need to do this. As long as we can light up the LED on the other side, we’re fine. (You might need a real +5 V supply if you want to connect a MIDI hub that is powered by the MIDI host, however.) To be guaranteed to light up the LED from 3.3 V, we’ll need to decrease the resistor values slightly. I found that replacing R1 and R2 in the schematic above with 150 ohms each works fine with my MIDI interface, but my calculations are suggesting that around 60 ohms may be needed, depending on the optocoupler. Bigger value resistor is safer, so try 150 ohms first. There are two ways to do MIDI in, either with an optocoupler or without one. If you want to be cheap, you can simply connect the signal pin (the lowest one) from the MIDI jack and connect it through a 820 ohm resistor to the RX pin (see below) of the microcontroller. The resistor is needed to protect the microcontroller chip from the signal which is using a +5V signal level, which is outside of the chip’s specified limits. If you do it this way, you also need to connect ground from the MIDI jack (the “NC” pin) to ground on the board. Do not connect +5 V pin (the upper pin) anywhere. If you want to do it properly, you can use for example a 6n136 or a 6n138. If you choose to use a 6n136, connect it as pictured above. (Connect +3.3 V, the red wire in the picture, instead of +5V in the schematic.) If you’ll be using a 6n138, you can use the connection below, according to Wooster audio. The part of the circuit that is to the left of the diode is the same as in the 6n136 circuit. The MIDI output is situated between the points with yellow and the red cables, i.e. 3rd from the top. If you’re using an optocoupler you need to add a small PCB for the optocoupler and the other components. (2-3 resistors and a diode.) I found that one suitable place for attaching this board is on the interface board. There’s a hole drilled where you can attach a board with a screw, as pictured below. Once again, however, I slightly misjudged the measurements. The board stuck out too long and collided with the speaker. Simple answer: You can sync the internal sequencer, play notes, and control all parameters the EG type as well as all parameters relating to the LFO section. It also transmits those very same things, so it could be used as a MIDI sync source, sequencer or limited control surface. Details Quirks/problems: When you’re using the miditribe as a MIDI slave and remove the sync clock, it will keep waiting for a MIDI clock indefinitely. You can fix this by either turning it off and on again, or plugging something in and out of the sync in jack, which will restore it to the internal sync clock. Quirks/problems: It has a stuck note issue when it doesn’t receive a note off message for a note. Let’s say you send a note on message for D4 and then a note on message for E4, and lastly a note off message for E4. This can happen in Renoise, for example. In this situation, D4 gets stuck, and a new D4 note is played as soon as you release all other keys. Sometimes multiple keys can get stuck, and you need to go through each key to depress each one.
Quirks/problems: It’s practically useless as a MIDI control surface because it is really slow at sending CC messages. If you wiggle one of the knobs a few times really fast for a few seconds, it will continue to transmit CC commands for several seconds. I’ve noticed that when controlling the LFO rate/int. knobs remotely, the value will sometimes jump back to the value that the knob is at. I’m guessing that this happens because there’s a small fluctuation in the voltage that the microcontroller will pick up as a change in the value. If you only want to control these parameters over MIDI, you can minimize this effect by turning these knobs fully counter-clockwise.
These are two videos showing me play around with MIDI in and MIDI out. Music sequenced in Renoise, played back on Korg monotribe and fed back into Renoise’s effects, some distortion and some delay. The drums are not played by the monotribe, but are samples in Renoise. Some people have been wondering why Korg didn’t just include MIDI support out of the box. First off, to be honest, I think the MIDI support is a bit buggy, and probably wasn’t ready to be released anyway. It might be something they implemented mostly for internal testing. Another possibility, which I don’t believe much in, is that they’re planning to release a MIDI-enabled “monotribe pro” later. I just don’t think that fits into Korg’s profile of how people will use the monotribe, so I don’t think there will be a pro version with MIDI. But, phew! Hopefully this should be enough information to get some of you up and running and get MIDI working on your ‘tribes. So what can we use this for anyway? Hooking up the monotribe to a computer and just use it as an analogue synth, honestly doesn’t provide any real advantages over using, say, a good softsynth, in my opinion. The monotribe’s charm is its hands-on usage, so I think the modification will be most useful for syncing it with gear where it’s more convenient to use MIDI sync than the sync options at the back of the monotribe. Another possibility for LSDj users, is to use Arduinoboy+LSDj MIDI out. You’ll be able to control the monotribe nicely and which will give you a nice analogue companion to LSDj’s digital sound. Other than that, the fact that monotribe can be used with MIDI also opens up the possibility of an internal mod. For the price it’s sold for, it’s a fun toy but not an essential tool. If the thing could be extended to be more TB-303-ish (not going to hide my dreams) it would instantly become more appealing to a lot of people. My original idea was to replace the firmware on the unit’s own microcontroller, but that’s difficult and tedious. My new idea idea is to add another microcontroller (’duino anyone?) which replaces the sequencer, and also gives the possibility to do things like slide (emulated with pitch bend) or accent (emulated by adjusting the LFO rate/intensity). You could also add a second LFO and all sorts of things. With some extra software and wires, this thing could become truly useful as a standalone unit… Useful links:Opening it up
Hackability and MIDI
MIDI, the electrical side of things
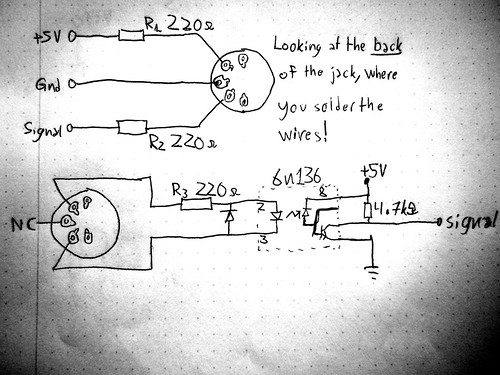
Upper schematic: MIDI out. Lower schematic: MIDI in. NC means “no connection”.
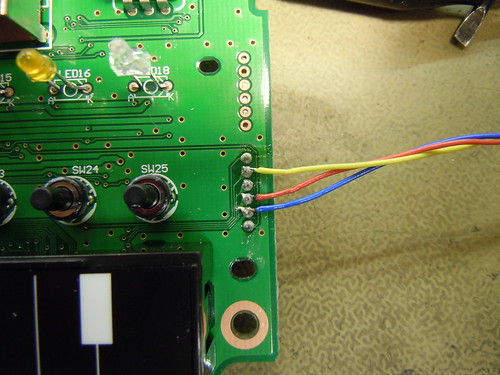
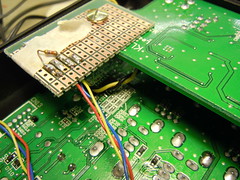
The picture above shows how I connected MIDI in with an optocoupler. The blue wire is ground. The red wire is +3.3V. The yellow wire is where the signal comes back (MIDI in.)MIDI, the mechanical side of things
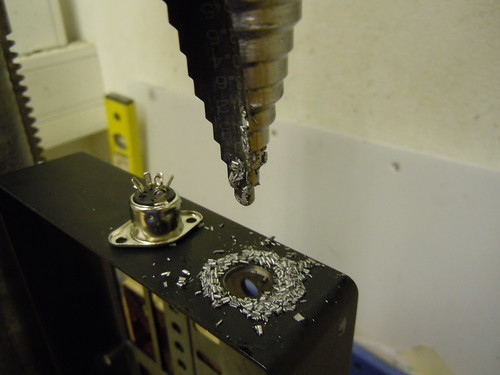
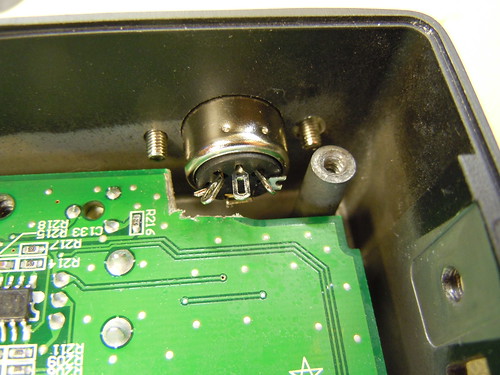
You drill a hole for the jack, simple enough. However, I’ll share these images as a cautionary tale that you need to pay attention where you drill the hole. Here I made two mistakes:
1) The hole was too high up, so the jack collided with the PCB. (You’re looking into the monotribe from the bottom, so up=down…) I solved this by trimming away a part of the PCB which was just a big ground plane.
2) The less obvious problem is that the hole was too far back, so one of the screw holes ended up behind the standoff. This is a problem because it makes it difficult to insert a nut behind the screw.
So, plan before you drill!

What can you do with MIDI on the monotribe?
Name
Note number
Note name
GM drum name
BD
36
C1
Bass drum 1
SN
40
E1
Snare dum 2/Electric snare
HH
42
F#1
Closed hi-hat
Name
CC number
Values
GM parameter name
LFO rate
16
–
General purpose controller 1
LFO int.
1
–
Modulation wheel
EG shape
80
32=decay
64=sustain
96=attack General purpose controller 5
LFO target
81
32=VCO
64=VCO+VCF
96=VCF General purpose controller 6
LFO mode
82
32=Fast
64=Slow
96=1shot General purpose controller 7
LFO wave
83
32=Saw
64=Triangle
96=Square General purpose controller 8
Videos
MIDI in
MIDI out
Video advertising this post, basically
Where do we go from here?/Final thoughts
Board photos and more on Flickr
My YouTube channel
Discussion on Muff Wiggler
Monomodder blog
August 15th, 2011 at 12:25 am
Nice work. No good to me, but good job!
August 15th, 2011 at 4:40 pm
[...] 久々にmonotribe同期改造ネタ。Synthtopiaに出てたんですが、Gameboy GeniusてとこでmonotribeのMIDI化改造の記事が出ています。Monotribe, MIDI and me(英文)がそれ。 [...]
August 15th, 2011 at 4:42 pm
First of all, bravo for all the work you did on this little piece of gear. I’m not going to lie, I fairly new to the world of electronic music and didn’t really understand the technical parts, I was just searching on the web on a way to implement MIDI on the thing I just bought.
However, some of the things you said in the “What can you do with MIDI on the monotribe?” part made me think hard, as I don’t master MIDI at all. So, if you don’t mind, I have a few basic questions.
The thing I want my monotribe to do is to be basically an analogue sound module controlled by another piece of equipment. I plan to buy an octatrack (Elektron) sampler which has 8 MIDI tracks to control external gear. With your MIDI mods, would it be possible for this Octatrack to program sequences that would play the Monotribe sounds? And still change the parameters of the sounds (LFO, VCO) on the monotribe?
THe thing that I think is extremely limitated on the tribe is the 8 steps step-sequencer. With your MIDI mods, is it possible to overcome that number of steps? For example, is it possible to program 16 or 32 steps sequences on the octatrack sequencer to play the monotribe sounds? Can I use an external sequencer to sequence the monotribe, to overcome those damn 8 steps?
If yes, is it “MIDI in” or “MIDI out” that I need for what I want to do?
I know this is a pretty long message with basic knowledge that I don’t master, but it would really help me if you could answer those questions, because I’m a bit lost at the moment. I beg your pardon for my poor english, this is not my native language; I hope you’ll understand what I’m trying to say even if it is poorly formulated.
Keep up the good work, and congratulations once again.
August 15th, 2011 at 4:47 pm
[...] ■Monotribe, MIDI and me(英文) monotribe自体のMIDI対応化改造。要旨は出た!「モノトライブとMIDIと私」にざっとまとめてあります。[8/15 螢屋追記] [...]
August 15th, 2011 at 5:08 pm
MIDI only goes in one direction, so to transmit data two ways, you need two cables. Normally, you never want to do that, though. What you want to do is connect MIDI out on the Octatrack (Octatrack already has this) to MIDI in on the monotribe. So MIDI in is what you need. That way you can send any notes you want to the monotribe. Doing this, you can still fiddle with the knobs. Or, you can even control some oft he knobs on the monotribe from the Octatrack, if the Octatrack has the capability to send “control changes”.
Hope that answers your question.
August 15th, 2011 at 6:05 pm
I just ordered the mono but I currently have the Octatrack. You can also send a pulse wave from the OT to the Mono to sync.
You can then of course use the Octatrack to sample the mono in time to the sequencer.
You can set up CC# on the OT to control the Mono params from the OT sequencer so you don’t really need midi out on the mono.
August 15th, 2011 at 6:09 pm
I forgot, quick question. Is there a possible CV and Gate output from the mono sequencer? I’ve been trying to figure this out.
It looks like the flux on the board is probably some kind of glue to hold the smts. The black stuff could be the result of the solderer hitting the glue.
August 15th, 2011 at 6:26 pm
There are probably a CV and GATE signals somewhere in there.
However, I do’t think the CV signal is 1 V/oct or anything similar, but just “random”. As far as I understand, the monotribe will retune itself, so if the internal CV response is non-linear/non-exponential, it will be almost useless for a 1 V/oct or similar modular oscillator.
Gate, maybe. However, some things point in the direction that the volume envelope is actually generated digitally. If so, you will get a decaying envelope if the EG switch is in the “decay” position, and a gate if it’s in the “hold” position and so on.
And no, that certainly isn’t glue. I could wash it away easily with alcohol, and you wouldn’t apply glue randomly like that. If you look at the first board picture, you’ll see residue that looks as if they put something on the board and left it to dry. And in the last board picture (number 4), notice some dry white residue to the right of the text R215 and R218. This board just wasn’t cleaned properly!
August 15th, 2011 at 6:28 pm
Oh, you mean that kind of glue… Maybe, but it’s still an indication that something isn’t right with their manufacturing process. And there’s still all the other residue all over the board…
August 16th, 2011 at 12:14 am
Allright, thanks to both of you for these great precisions! That certainly helps me a lot!
Just to be sure: when you say that the octatrack could play any note, does that mean that I could play some sequences longer than 8 steps? like 32 steps sequences from the Octatrack with the sounds of the tribe?
Thanks again for the answers!
August 16th, 2011 at 3:23 am
Great write up . Thanks !
August 16th, 2011 at 3:31 am
Maddkat: As far as the monotribe is aware, you could just as well be playing notes on a MIDI keyboard, when you’re sending MIDI from the Octatrack. Monotribe’s own sequencer doesn’t even come to play in that case. If Octatrack can do 32 steps, that’s your limit.
August 16th, 2011 at 5:12 pm
Great, that’s exactly what I wanted. Well, let me thank you one more time for giving me some of your time and some great answers. I really appreciate.
Keep the good work going, I’m definitely going to keep an eye on your blog. Oh, and I subscribed to your Youtube channel. Nice videos.
Have a nice day.
August 17th, 2011 at 12:36 am
Hi,
I’m going ahead with the same mod using your instructions. I was just wondering about the LED on the MIDI in side of the first circuit diagram (Left hand side of the 6n136). I studied your photos but couldn’t see an LED at all. Is it really needed or can I leave it out? If I do need it are there any specific type of LED I need to use?
thanks for the great post and help in advance.
Cheers!!
August 17th, 2011 at 12:57 am
Hello. The diode inside the rectangle is the LED that is inside tho optocoupler chip. The diode to the left of the chip is a so called small signal diode like 1n4148 or 1n914, not a LED. I’ve actually used a surface mount version of it which is hidden under the tape. I’ve updated the post to clarify this.
August 17th, 2011 at 8:49 am
Thanks for updating the blog with the diode details. Once I have done my mod I’ll let you know how I got on.
Cheers, VCOADSR
August 17th, 2011 at 10:47 pm
So, basically, for MIDI in I will connect the yellow (with 820 ohm resistor) and blue wires like yours?
August 17th, 2011 at 11:01 pm
also, does the 820ohm resistor need to be 1/4, 1/2, or 1watt?
Thanks man!!
August 17th, 2011 at 11:06 pm
Also, for monoTRON: http://beatnic.jp/monotron/midi-kit.html
This allows for midi control. Also, glide, pitchbend via midi, and mod control via midi.
Cheers!
August 18th, 2011 at 2:37 pm
MIDI IN confirmed working on my Monotribe… I hooked it up the cheap way just like you described and used a 1000 ohm resistor instead of the 820 ohm you recommend because that’s what I had laying around; it still works just fine. This is truly a pleasant surprise - thank you so much for the time you took to find this out. I am so happy to be able to use this thing as a real analog monosynth instrument now!
I always kind of figured the midi mod would come, but I thought it would involve an expensive kit or complicated procedures. I am really excited to see where this development goes!
Cheers from Japan
August 20th, 2011 at 7:53 am
Ditto: MIDI IN functioning nicely on my MonoTribe.
HOWEVER** I initially tried the circuit using the 6n138 opto, this gave undesirable results as the 6n138 was generating midi ‘noise’ (zipper sound when pitch bending or clicks when receiving midi clock or any midi message). I tried reworking the resistor values and even swapped the IC thinking I had a bad one, all to no avail.
What fixed it? K.I.S.S. (Keep it super simple) and just did the quick and dirty 820 ohm resistor trick and I couldn’t be happier.
Maybe a 6n136 or PC-900 opto would give better results, but for now I’m rockin’ a fully midi in capable Monotribe using the ‘easy’ method.
Erik
August 20th, 2011 at 9:45 am
Nice work man! Keep it up!
CB
August 20th, 2011 at 10:45 am
Erik: Did you leave a comment on my YouTube channel? If not, then that makes two people complaining about noises…
This could be one of two things.
1) The ‘tribe can’t handle the rate that the pitch bend messages are coming in at.
2) The optocoupler is using a lot of energy when it’s receiving data so it’s actually wiggling the 3.3 V power line up and down slightly, which in turn creates interference.
It seems like 2 is the more likely option based on your description. I’ve had no such problems with my 6n136, but on the other hand I’ve been using wall power. Did you use batteries?
Thank you for the feedback. The more is known, the better…
August 21st, 2011 at 12:45 pm
Hey Nitro,
I’m using a 9v walwart 1.7amp regulated to push the tribe. I plan on re-working the circuit with a 6n136 to see if that helps clean up the noise. I couldn’t see any real difference in the specs between the two but couldn’t hurt to try.
Erik
August 23rd, 2011 at 11:18 am
Hi, I’ve add MIDI on my monotribe. and it works so fine. thank you for your information. I write page in Japanese for your Japanese fan. thanks again!
http://beatnic.jp/takedanote/vol31/
August 23rd, 2011 at 11:32 am
Hello.
At that time, I did not have an enough analysis.
Congratulations on the analysis. And, it is wonderful.
I also similarly remodel it.
Thank you.
http://airvariable.asablo.jp/blog/2011/06/01/5895001
September 2nd, 2011 at 6:21 am
[...] as some of the limitations (which in turn partly explain why this didn’t ship with MIDI): Monotribe, MIDI and me [Game Boy musician nitro2k01's [...]
September 2nd, 2011 at 6:25 am
[...] as some of the limitations (which in turn partly explain why this didn’t ship with MIDI): Monotribe, MIDI and me [Game Boy musician nitro2k01's [...]
September 2nd, 2011 at 6:15 pm
this is a link to a video showing the monotribes wireless midi capabilities at the end of the video. its awesome and eliminated the need to physically mod the tribe although its a little hard to make our exactly how its done i would like peoples thoughts on this and any further info they might have, enjoy! http://www.youtube.com/watch?v=eeQ-G5j3r-8&feature=player_embedded
September 2nd, 2011 at 6:16 pm
this is a link to a video showing the monotribes wireless midi capabilities at the end of the video. its awesome and eliminated the need to physically mod the tribe although its a little hard to make our exactly how its done i would like peoples thoughts on this and any further info they might have, enjoy! http://www.youtube.com/watch?v=eeQ-G5j3r-8&feature=player_embedded
September 2nd, 2011 at 7:32 pm
Actually, that’s just for sync. It’s the same old SyncKontrol software like before, only now it supports MIDI sync over Wi-Fi as well. The page even specifies that the app can only sync, not restart the sequencer. Also, it’s only for Mac as far as I can tell.
September 7th, 2011 at 7:35 pm
sorry, I’m a newbie in electronics and english is not my mother language so I’m having some problems with your tutorial (that’s absolutely my fault!!). I’d like to do the “easy” MIDI In mod but I can’t understand how! If I’m right I have to plug just 1 wire FROM the signal pin of the midi jack ( I don’t know where the signal pin is) TO the RX pin (which I assume is somewhere on the PCB but I don’t know where!!!) , and put a resistor between them! I’d just like to know if I am right and where are the points you’ve mentioned! thank you very much and… you’re doing an amazing work, keep it up!
September 7th, 2011 at 8:52 pm
Hello. Connect the pin ground pin (middle) directly to a ground point on the board, such as the where the blue wire is connected.
Connect the “signal” pin to a resistor. Connect the other side of the resistor to where the yellow wire is connected.
Gnd — Gnd (Blue)
Signal — 820 Ohm or more* — Yellow
*You can use a slightly higher value if you want. 1k, 1.2k etc. will work too.
Also, remember that in the picture, you’re looking ath the BACK of the MIDI socket. If you mirror it, but do everything else right, you will not damage anything, but you will get no MIDI.
September 7th, 2011 at 9:37 pm
thank you very much, you are really kind and clear I’m really psyched about doing this mod!!!
September 11th, 2011 at 4:24 pm
ok, it works now! Just one thing: midi works just on one of my three midi keyboards… Could it be because I used a 1k resistor instead of the 820 ohm one? By the way it’s such a different and satisfying approach to the instrument: not just a groovebox but a simple nonetheless amazing analog synthesizer! As I told you before I’m really not good in electronics but I was wondering…. Is in your opinion possible to add for example a monotron to the monotribe and use it a 2nd oscillator? Could it be a possible mod? Thank you!
September 13th, 2011 at 9:38 pm
Hello. If the simple method doesn’t work, this may mean that the ground pin in the keyboard that doesn’t work, is unconnected. Normally it’s not needed for MIDI, so maybe they left it out. This fits your description of the problem.
Using the optocoupler version should work if this is the problem. 6n136 is probably better since some people had problems with the 6n138 circuit.
If you want to use the “easy” circuit… Just to troubleshoot, try making a connection between the ground points of the keyboard and the monotribe. For example, connect a wire to the ground screw and touch it to a ground point of the keyboard, or something connected to the keyboard. For example, touch the wire against the shielding of a USB plug or the “sleeve” of an audio cable coming out of the keyboard. Or if the keyboard is connected to a computer, add a second USB cable and touch the shielding to ground screw of monotribe. And see if MIDI works when you do that.
However do not assume that the outer part of the power plug (ring) is ground, unless you check that the adapter is center positive. If it’s center negative, the ring is positive, and connecting monotribe ground to the positive power, when using the easy circuit, may damage the monotribe.
If it works when you do this, then I can try to figure something out.
September 16th, 2011 at 2:43 pm
Maybe I am being stupid but in your text you say that the cheap way of connecting midi up is to connect the signal (lower) pin. From the diagram it looks like the signal pin is the upper pin the way its drawn.
September 16th, 2011 at 7:55 pm
Hello, fleetway76. Lowest refers to the lowest of the three connected pins in the drawing of the MIDI jack.
September 18th, 2011 at 1:35 pm
hiii there thank you for great mod
i have a beginner question
i need only the midi out cause i want it to work my doepfer dark energy
will it work fine?
and if so the i dont need the chip? i only connect the two 220 res and the signal out to the midi connector?
thanks
September 18th, 2011 at 10:23 pm
Babagali: Correct. No need for the optocoupler for MIDI out. That’s only for MIDI in.
Minimal MIDI out:
Look at the schematic in the “electrical” section, and the photo with the wires attached. The upper schematic is for MIDI out.
Connect +5 on the MIDI jack to the red wire. Connect “signal” to the connection between the yellow and red wire. (Yes, the signal output is unconnected on my unit.)
Use resistors on both the connections. Since the monoribe’s digital circuitry is using only 3.3V, I suggest using a slightly lower value resistor. 150 ohms in both places will probably work.
Optionally
Gnd on the MIDI jack — Gnd (Blue)
Normally not needed, but will not hurt.
September 19th, 2011 at 6:57 pm
man i just finished one hour sesion with my moded monotribe and the doepfer dark energy fricken crasy i have to thank you man its realy great what you are doing sharing all this info and helping who needs help
bravisimo
September 19th, 2011 at 7:15 pm
Cool. If you record something cool and put it up on soundcloud or something, please leave a comment about it here.
September 28th, 2011 at 9:47 am
Excellent work, very inspirational as usual.
September 28th, 2011 at 10:23 am
ehi! I’ve tried to connect the ground points but nothing happened… However I’ve done the optocoupler mod with a 6n136 ic and it works perfectly! Thank you very much for always answering me you’re a fucking genius!
September 28th, 2011 at 4:23 pm
I tried the simple midi mod but I can’t get it to work. It’s so simple i’ve somehow screwed it up
I’ve connected the yellow wire in your photo to an 850ohm .25 watt resistor, then connected to pin 4 on the jack. I took the blue wire and connected to pin 2 on the jack. I’ve tried a variety of combinations and movements but nothing. Should I have used a different resistor? Any suggestions? I don’t think i bridged any of the terminals when I soldered the wires to the PCB. The monotribe works fine otherwise. It responds to sync on the sync port, etc.
I’m baffled, but not surprised I screwed something up
September 28th, 2011 at 5:01 pm
Mark, my first guess would be that you have connected the signal to the wrong pin of the DIN jack. If I’m not messing up the numbers, I believe it should be on pin 5, not pin 4. In other words, that you have “mirrored” the MIDI jack connection.
My second guess would be that the ground connection is missing either in the thing transmitting MIDI, or in the cable. If you have a multimeter, you can investigate this, as detailed in my previous comments.
If this is indeed the case, the simplest solution is to install an optocoupler.
September 29th, 2011 at 3:17 am
It does appear to be the ground jack is not connected in my controller. I’m using a Juno 2 as my main midi keyboard. When It’s connected directly, or indirectly with a midman 2×2 in the middle, no luck. BUT when I route it through protools it works just fine. So the midiman is grounded, but when the Juno is going through the midiman it won’t play. Latency isn’t noticeable playing through protools so it’s a livable situation. I have other things I need to control anyway which means this is normal for my work flow anyway.
Thanks for taking the time to respond to all of our requests for help. It’s very generous of you.
September 29th, 2011 at 3:20 am
Oh yeah - Is there anything to try that would get rid of the clicks when a note is triggered? I ended up using a 1000ohm resistor at one point last night trying to troubleshoot it. I don’t know if the resistor has anything to do with the click.
Thanks again for all the help.
September 29th, 2011 at 8:11 am
my midi out monotribe home made with your help yeaaaaaaaa
http://www.youtube.com/watch?v=JE1p2euOWvc
October 4th, 2011 at 7:25 pm
Hello,
Can I use a 6N137 optocoupler instead of 6N136?
thnx
October 6th, 2011 at 7:07 am
6n137 is only specified for 5V, not 3.3 V, operation but might work anyway. Try connecting it like 6n136 above, and also add a capacitor of 100 nF or more between pin 5 and 8 (ground and power).
October 6th, 2011 at 9:15 am
Thanx!
Awesome job of dissecting the Monotribe by the way!
It’s great to have people like you sharing their finds…
Cheers
M
October 7th, 2011 at 10:28 am
[...] komplette Anleitung für den MIDI-Mod findet ihr hier. Darüberhinaus gibt es aber auch noch Mods für CV In (hier), Einzelausgänge der Drums (hier) und [...]
October 29th, 2011 at 11:14 pm
Thanks so much for explaining this, I’ve been having fun with my midi monotribe. Here is the first recording I did using it:
http://soundcloud.com/nextdoorninja/knob-soup
Cheers!
ndn
October 30th, 2011 at 8:17 pm
Hi. A big thank you for this detailed post.
I spent the weekend adding a midi in connection through an optocoupler and some of monomodder’s decay mods while I had it open.
Being able to control it via midi takes it from a toy to a real instrument. Thanks again!
Cheers.
|M
November 4th, 2011 at 4:43 pm
Great Article and info! Thumbs up!
About “duino” newimplant brain…
Why not a teensy?
-m!
November 30th, 2011 at 9:04 am
hi,
first off - thanks for the tutorial.
wanna make sure i got things right. if you say:
It will send and receive notes within the limits of the sequencer. It’s using channel 1 for notes. Notes outside these limits will be ignored.
does that mean that the max available range on midi keyboard for synth notes is the one+ octave range like on the ribbon? or is it possible in wide mode to use all its available 6 octaves at once?
thanks,
mart
December 2nd, 2011 at 4:10 pm
System Version 2
Announcing a major update for the monotribe!
Version 2 provides many new features to take your playing to a new dimension!
Announcing a major update to the monotribe analog ribbon station — the full-fledged analog synth and rhythm unit with a step sequencer inherited from the Electribe! The monotribe Version 2 adds a plethora of new features, allowing you to create sequences that are even more elaborate, or to layer complex musical developments for extended performances.
Surely one of the most exciting additions is a new synchronized performance mode that allows for new type of performance using multiple monotribe units. Whether you’ve never touched a monotribe or whether you’re an expert who is thoroughly familiar with all of the current features, this new update guarantees that your analog groove-making will be more intense than ever before!
Highlights
Sequencer:
Synth part resolution has been doubled to 16 Steps
Volume Automation has been added to the synth part.
Active Step can be specified for each part.
Drum Roll capability has been added.
Gate Time Hold function has been added.
Synthesizer:
Sample and Hold (S&H) function added to LFO.
Sync:
Connected sequences allow multiple monotribe units to play in rotation.
Half Tempo function has been added.
Short Cut Keys:
Four convenient shortcuts for creating patterns quickly
16-Step Synth parts
As with drum parts, the synth part now provides timing information in between the steps in a sequence, allowing a pattern to achieve a total of 16 steps.
Synth Part Volume Automation
Volume Automation allows the synth volume to be recorded during playback to create more detailed sequences. The left side of the ribbon controller keyboard decreases the volume, and the right side increases it. This Volume Automation can even be controlled when if Flux mode is on.
Set individual Active Steps for each Part.
The Active Step function lets you specify which steps are played or jumped when playing back the step sequencer. Now, the Active Step can be set individually for each of the SYNTH, BD, SD, and HH parts. By specifying a different number of steps for each part, you can create complex polyrhythms.
Sample & Hold (S & H) added to the LFO
The newly added S&H function is indispensible for creating mysterious analog synth sound effects. The RATE knob adjusts the frequency of change, and the INT. knob adjusts the depth of change.
“What is Sample & Hold?”
Unlike traditional LFO waveshapes that provide a constantly changing signal, the Sample & Hold feature takes a “sample” of the LFO signal and holds that level for a specific duration of time. The results are the highly popular and slightly random stepped-filter effects so famously used in analog synthesizers. By using noise as the input signal, the monotribe version 2 lets you create effects that change in a distinctively random manner.
Drum Roll capability
A roll can now be added to the desired drum part. The speed of the roll can be controlled using the ribbon controller keyboard; moving toward the right will increase the number of strikes. You can also record the drum roll using the sequencer to intuitively create subtle and dynamic drum patterns.
Linked Sequences play multiple monotribes in rotation
The Link Sequence feature is a completely new sync method that vastly expands the scope of the monotribe, to deliver even more fun. When sequence playback reaches step 8, the sequence will automatically stop and the next monotribe unit will start playing. By loop-connecting the SYNC jacks, the playback can keep cycling through multiple units – in true modular fashion!
New Additions
The Gate Time Hold function lets you use the ribbon controller keyboard to play and record new pitch information while retaining the gate times recorded in the sequencer. Also new is the Half Tempo function, which cuts the tempo in half when synchronizing to an external input from the SYNC IN jack. In addition, there are now four shortcut keys that instantly initialize various types of sequence data or active step settings.
Updating Procedure
Thinking of monotribe as an analog synthesizer, the procedure of for updating the Operating System is also a very old-school, analog-style method, reminiscent of loading data via the playback of analog cassette tape. Simply download the system data which Korg has encoded as an audio (WAV) file from http://www.korg.com or from the website of your local Korg distributor. Then, play back the file using a WAV file player like a Smartphone or using PC application software, directly in to the monotribe’s SYNC IN jack. When the audio (WAV) file finished playing, your monotribe has been updated. It’s a traditional procedure revived for a new generation!
WARNING!
Do not playback the system update file on any speaker or headphone system as this could lead to damage to equipment and/or hearing loss. Neither Korg nor any of its affiliates will accept responsibility for any damages, personal loss or injury that may result from playback of the file.
December 2nd, 2011 at 4:37 pm
Monotribe v2 is out now and, with midi in plugged, it DOES react to varying velocities !
December 2nd, 2011 at 6:47 pm
these are good news, i’d like to know what v2 modded MT are able to !!
December 2nd, 2011 at 7:23 pm
So … OSV2 does not interfere with the Midi mod at all ?
As space is limited I would of thought something in midi code would have bit the dust
December 3rd, 2011 at 3:23 pm
It does not interfere but probably due to the new function which allows you to regulate the synth volume of a sequence, when playing monotribe with a midi keyboard (i think even sequencing it with an external sequencer) it does react to varying velocities, which is actually good!
December 4th, 2011 at 5:33 am
[...] Monotribe, MIDI and me [...]
January 2nd, 2012 at 8:31 pm
IT WORKS!!! Thanks for this great tutorial! I first tried the quick n dirty method, but could not get the monotribe to respond to any midi. So I wired up a 6n136, and it works beautifully! Strangely, it doesn’t respond to start/stop from it’s grandpappy, the ER-1, altho it does receive note data. I can start/stop it from my HR-16 just fine. Will try some more gear, after I finish jamming.
January 12th, 2012 at 12:53 pm
@burnkit2600. I tried hooking up the monotribe to my own ER-1 with the quick and dirty method, but that doesn’t do anything.. So it will be 6n136 for me as well. Did you manage to figure out the ER-1 start/stop issue?
January 13th, 2012 at 5:44 pm
@Rene- Whoops! I guess it pays to RTFM. The ER-1 needed to be set to Global Clock -> INT. Now it triggers the monotribe just fine. Start/stop/continue. I’m taking this thing to it’s first gig this weekend!
January 15th, 2012 at 4:55 pm
With the new OS update, midi control values have been added to the above chart. Firstly it adds sample & hold LFO shape, which is now accessible via CC83 (LFO wave) at full clockwise value. Volume is also aded at CC7. There may be others I haven’t found yet
January 18th, 2012 at 10:16 pm
Hello, I just connected a midi in jack the easy and cheap way and the monotribe works with a usb-midi adaptor but not with my keyboard midi controller. I suppose because the keyboard’s ground terminal is not connected. Is there another spot on the monotribe’s midi in connector that is at the keyboard’s ground that I could connect to the ground terminal? If not, I’ll go order an optocoupler.
Also, I’ll test out my keyboard controller by running a wire from the keyboard’s ground to the monotribe’s ground screw. if the keyboard is powered by AA batteries, will the negative end of one of the batteries be ground?
January 20th, 2012 at 8:06 pm
hello there!
I’ve recently added midi out and midi in via 6n138 to my monotribe. I want to use it solely for clocking, as i don’t have any hardware sequencers and don’t want to use the PC.
It works really reliable. I also found out that the midi out functions as a midi thru, which is nice (at least for clock signals it does).
But theres one thing: In relation to my other midi equipment, the monotribe always runs at double speed. So, when i clock eg the c64 running mssiah FROM the mono, the mono plays it’s 16 steps (OS v2) TWICE while the c64 plays the 16-step pattern ONCE.
The same thing happens when the mono RECEIVES clock: 16 steps on the gameboy running nanoloop are 32 steps on the mono (i’m using arduinoboy).
Did i screw something up or is it maybe that the 16 steps of the monotribe aren’t really 16 steps but only 8 steps with a workaround to make it appear 16 steps?
hope this makes sense…any comments appreciated!
January 21st, 2012 at 1:31 am
Short answer, I don’t know. I haven’t had time to do anything monotribe related lately. I haven’t even updated to 2.0. Try asking on Muff’s cat forum. (They have some good synth subforums as well, because cats often like sitting on synths.)
In LSDj you could run at half the tempo and use a 3/3 groove. The 3/3 groove will make the sequencer run twice as fast to compensate for the lower speed. Tables and wave instruments will still run at half the speed though, so those will need some fixing.
February 3rd, 2012 at 9:49 pm
Wow, that’s pretty cool that the Monotribe supports MIDI. Not sure I want to drill into my unit though… maybe after the warranty expires. And BTW ver 2.0 is great… the drum roll feature is awesome. So much fun to play with
February 13th, 2012 at 12:41 am
Dear public, I’m having some trouble with my opto-isolator midi circuit. No midi device I’ve tried produces any effect on the monotribe. I’ve posted a link to a picture of my circuit. I’m using the 6n136. Purple wire goes to a 220 ohm resistor and midi din terminal 4, blue wire goes to midi din terminal 5, red wire goes to 3.3v, white wire goes to RX of monotribe’s serial port, and black wire goes to ground.
Any troubleshooting advice would be appreciated!
February 13th, 2012 at 12:42 am
Btw click on my name “Mike M” to view the picture of the circuit
February 13th, 2012 at 1:00 am
Mike, the TLP2531 is not 6n13x pin compatible. It’s a dual optocoupler, so the pinout is a bit different. Always check the datasheet when you substitute components. If you move the purple wire from pin 2 to to pin 4, the circuit should work, given that the chip is tolerant enough to work with 3.3V on the receiving side and that the 4.7k pullup resistor works for this chip as well. (You should also flip the diode to keep the protection, of course.)
February 13th, 2012 at 1:09 am
Really, did I order the wrong part? Thank you for your advice, I’ll swap the wires and report back.
February 13th, 2012 at 1:41 am
Another thing… I’m noticing that the copper is not actually filled in between the holes. If this is the same on the bottom side, you’ll need to connect the traces.
February 14th, 2012 at 12:48 am
No luck. I switched the purple wire and verified conductivity from the end of each wire up to the optocoupler. There are traces organized like a breadboard on the the underside of the proto board.
February 29th, 2012 at 4:38 am
I have a followup question, is the outside ring of a MIDI cable grounded? Might connecting pin 2 from the MIDI IN jack to the outside ring let ungrounded MIDI controllers work with the non-optocoupler mod?
April 19th, 2012 at 3:24 pm
Great job. I think many people own you a thank you for this. I have also to say, after adding a midi mod, that I find the little synth incredibly nice as quality of the filter/vco but lack some playability by MIDI. Therefore (initially just for myself) I started to tweak in software to get the best out of it. Most of it is exactly what you also suggest: glide by pitch bending, accent (key tracking) by LFO modulated by pitch etc. I also discovered that the LFO in fast mode can very nicely be tuned in real time, adding a extra source of modulation (sort of FM/second oscillator) and this gives you a very fat sound! Then I also added presets and other goodies.
At the end I ended up having a very powerful editor, so I decided to to a payed version (just 5 USD, very democratic price…) and also a scaled down demo/free version (all apart from saving presets).
If you have interest, check it here:
http://fabriziopoce.com/MTribe.html
And if you do not want to get 5 USD out, grab the demo. It is free and useful as well.
Cheers
Fabrizio
April 20th, 2012 at 5:47 pm
it seems the Monotribe syncs to 12p not 24p like classic midi clock, so you get half a bar in sync, i’m trying to use a µC to modify the midi in clock to half, fourth and eighth of its original pulse to get things more fun!
August 12th, 2012 at 3:32 pm
Have you guys tried holding down 1 & 8 on the sequencer and turning the monotribe on? You have to hit the power button twice, but then it powers on and makes noise, and boots into some sort of weird mode… Wonder if it’s a testing mode or something like that. Just thought I’d see if anyone else tried that.
October 31st, 2012 at 9:14 pm
Would it be possible to use 6n137 in one of the schematics above, or would it require a new configuration / resistor values?
November 4th, 2012 at 6:41 pm
Has anyone found a way to silence the ‘click’ at the end of a synth note?
(or: how could add some decay? )
the clicking gets really annoying after a while.
It sounds like there’s a ‘gate’ on the synth sound, perhaps that could be tweaked??
January 26th, 2013 at 3:59 am
Hello I was just finishing de modification and had it working with a kaossilator pro and when i turned it off and on again the monotribe would just make some weird noise but wont light any of the leds and not work at all , what could have happened?is there any way to reset the thing i appreciate any answer Sorry for my english. HELP PLEASE!!
January 26th, 2013 at 4:20 am
Hello. When closing the unit, make sure that the cable connection between the main board and the back panel is correctly inserted on both sides. Also make sure there are no short circuits.
That’s what I can think of. The other alternative is that the software is destroyed (this should not be possible) or that the CPU is destroyed by overvoltage (unlikely unless you’ve accidentally connected something from the analog section to the CPU section.)
February 5th, 2013 at 2:25 am
Oh no!! Can’t make midi work (loser!!) I tried to do the cheap straight forward mod, but no luck no midi.
 can only concluded must have fried 820ohm resistor or midi/DIN plug defective.
I checked connections, no shorts that I noticed, rechecked, resoldered, checked again… nothing. Tried two different keyboards: a USB/midi controller and master keyboard (triton extreme), checked midi channels too to make sure keyboards were on one, but nothing
REALLY STUMPED, no seems to have a problem.
any ideas ??!?
April 27th, 2013 at 8:00 pm
Thanks for this great guide and all your research! I have a tiny problem with my build though: when I connect a synth keyboard with both midi in and out and press a key, the monotribe responds by sending back via midi the last note that was played on it using the sequencer or the ribbon. Everything else seems to work perfectly. I tried it with two different synths. Please help, what could be the cause?
June 4th, 2013 at 9:02 am
Thanks man! Finally figured it out. Seems the simple way to get the midi-in to work doesn’t work with the Oxygen 8 but as soon as I ran the midi out of my Octatrack it was cranking. Might want to note that. I’d make a schematic for just the simple way. All that other stuff just confused me big time. I got a better idea reading some of the comments. Thanks again!
(this would have help in my case)
PARTS LIST -
- Midi Cable
- 820 ohm resistor
June 13th, 2013 at 6:59 pm
Here is amazing USB option for Korg Monotribe http://www.altmustech.com/um-q110.html
July 3rd, 2013 at 6:30 pm
Hi guys tried the midi in mod and could never get it to work properly seemed to play a single note and get locked on but never the way it should… Nor did it sync the bpm…
Anyway as i bought a minibrute and the new monotribe update came out I removed the midi as thought I wudnt need it… Now the sync in doesn’t work at all!!!
when I use syncKontrol app to the sync in I can hear the pulse and the monotribe won’t sync at all… Any ideas how I can fix this???
December 25th, 2014 at 9:00 am
[...] ???Serial?????????????????????????????????????????????????? ????????Gameboy Genius????????nitro2k01??�Monotribe, MIDI and me�????????????????????????????Monotribe?MIDI???? [...]
April 22nd, 2017 at 12:25 am
[...] Genius has published an extensive set of photos and a blog post on how to add MIDI In and MIDI Out to a Korg [...]
April 28th, 2017 at 9:41 pm
On the schematic you show +5V for the MIDI OUT
and on the photo you say
The MIDI output is situated between the points with yellow and the red cables, i.e. 3rd from the top.
So where on the board do I get the +5V from, to follow your schematic?
September 29th, 2017 at 4:09 am
Hello GameBoy Genius, I’m trying this modd with 6N137 and so far it doesn’t work but OK I’ll keep pushing (maybe faulty soldering). I just want to know if this comment-feedback line is still alive, thank you so much for your work and sharing. Greetings from Argentina.
May 16th, 2019 at 2:49 am
[...] Monotribe, MIDI and me – also shows a 6N136 circuit [...]