![You suck at protoshop. No, you [i]really[/i] oo.](http://blog.gg8.se/images/you-suck-at-photoshop-you-really-do-your-awful.png)


Dumping the boot ROM of the Gameboy clone Game Fighter
December 9th, 2014
Game Fighter posts:
- Teardown
- Dumping the boot ROM
Inside every Gameboy there’s a small boot ROM, which scrolls the Nintendo logo down from the top of the screen, and plays the iconic po-ling sound. This 256 byte boot ROM also checks that said Nintendo logo is present in the ROM chip of the cartridge, and validates the checksum of the header. Up until the 1992 legal case Sega v. Accolade it was believed that this check gave Nintendo the legal authority to control which games were allowed to run on the console, as the “Nintendo” logo was copyrighted by Nintendo, but the the ruling gave a strong precedent that using this small piece of copyrighted data to achieve interoperability was allowable.
The boot ROM locks itself out from being read before leaving control of the CPU to the program running on the cartridge, maybe more due to necessity than preventing read-out of the ROM, since the bottom memory area near the CPU entry point also covers the interrupt vectors, which the game needs access to. But as a result, this boot ROM remained an elusive secret, which was assumed would never see the light of day.
It was not until 2003 that Neviksti extracted this ROM from a DMG, decapping the CPU chip, looking at the CPU die with a scanning electron microscope and painstakingly reading out the bits visually, all 2048 (8*256) of them.
In 2009, costis extracted the SGB boot ROM by externally overclocking the CPU right at the time when the boot ROM shuts itself out, which causes the write to the lock-out register to be ignored, and then it could be copied to the outside world. The GBC boot ROM was also dumped this way by costis soon after.

Just this year (2014) BennVenn made the process child’s play with a silly but effective method. All you need to perform the attack is a piece of wire! You solder one end of the wire to one of the crystal oscillation circuit, and scrape the other end of the wire against any grounded surface in the Gameboy, such as copper shielding plate. This causes the CPU to glitch to jump to a random location. If you’re lucky, this allows you take control of the code execution and, again, dump the boot ROM.

But, what about pirate Gameboy clones? For example this Game Fighter, which is a horizontal Gameboy clone. Also see my detailed teardown and analysis of this beauty. It also has a boot ROM, though slightly different in function. The Game Fighter, instead of scrolling the logo down the screen, starts the game immediately. I also knew from before that it checked that the logo was correct, but not the game’s ROM header checksum.

So I wrote a small program, did the glitching procedure and voila! I had the boot ROM. You can download it here:
Game Fighter boot ROM download
If you really wanted, you could use this ROM with BGB and for example single step through it in BGB’s debugger. To do this, go into BGB’s settings, go to the system tab, then check the bootroms enabled option, and point the DMG boot ROM field to the ROM file.
Since the Game Fighter boots immediately, unlike an original ‘boy, I made the ROM have an invalid logo in its header so it would lock up and give me time to try to glitch the execution. The procedure was the same as on an original Gameboy: Find the one the pins of the crystal driver that is the input, solder a wire to it, (pictured above) and brush the other side to a part of the board that is ground. For the Game Fighter, I found that I had better luck getting it to work if I first shorted it to ground (for example the negative battery terminal) on power on, then brushing it against the surface as I let it go.
I will post the program I used for dumping the boot ROM later, along with a more detailed description of how it works.
Here’s the boot ROM disassembled, which holds an interesting secret! (Disassembly of the original DMG boot ROM for comparison.)
        ld   sp,$FFFE           ;  0000  Set up the stack pointer.

        ; Clear VRAM.
        xor  a                  ;  0003
        ld   hl,$9FFF           ;  0004
Addr_0007:
        ldd  [hl],a             ;  0007
        bit  7,h                ;  0008
        jr   nz,Addr_0007       ;  000A

        ; Set up sound.
        ld   hl,$FF26           ;  000C
        ld   c,$11              ;  000F
        ld   a,$80              ;  0011
        ldd  [hl],a             ;  0013  [$FF26] = $80 Turn on sound

        ld   [$ff00+c],a        ;  0014  [$FF11] = $80 Channel 1 wave duty
        inc  c                  ;  0015
        ld   a,$F3              ;  0016
        ld   [$ff00+c],a        ;  0018  [$FF12] = $F3 Channel 1 envelope
        ldd  [hl],a             ;  0019  [$FF25] = $F3 Channel routing
        inc  c                  ;  001A
        ld   a,$C1              ;  001B
        ld   [$ff00+c],a        ;  001D  [$FF13] = $C1 Channel 1 low frequency byte
        ld   a,$77              ;  001E
        ld   [hl],a             ;  0020  [$FF24] = $77 Master volume

        ; Set up graphics.
        ld   a,$FC              ;  0021
        ldh  [$FF47],a          ;  0023  [$FF47] = $FC BG palette
        ld   a,$91              ;  0025
        ldh  [$FF40],a          ;  0027  [$FF40] = $91 Turn on LCD

        ; Compare the second half of the logo in the header against
        ; the second half of the Nintendo logo stored in the boot ROM.
        ld   de,Addr_0043       ;  0029
        call Addr_0073          ;  002C
        cp   a,$34              ;  002F  Will return $34 if successful.
        jr   nz,Addr_0036       ;  0031  If not, jump to a second compare operation.
        jp   Addr_00FC          ;  0033

        ; Compare the second half of the logo in the header against
        ; the second half of the mystery logo stored in the boot ROM.
Addr_0036:
        ld   de,Addr_005B       ;  0036
        call Addr_0073          ;  0039
        cp   a,$34              ;  003C  Will return $34 if successful.
Addr_003E:
        jr   nz,Addr_003E       ;  003E  If not, get stuck in an endless loop.
        jp   Addr_00FC          ;  0040

        ; Second half of the Nintendo logo, $18 bytes
Addr_0043:
        db   $DC, $CC, $6E, $E6, $DD, $DD, $D9, $99
        db   $BB, $BB, $67, $63, $6E, $0E, $EC, $CC
        db   $DD, $DC, $99, $9F, $BB, $B9, $33, $3E

        ; Second half of mysterious RIS or KIS logo, $18 bytes
Addr_005B:
        db   $00, $00, $00, $00, $76, $66, $C6, $31
        db   $00, $19, $66, $FF, $01, $88, $38, $C7
        db   $C6, $C8, $00, $00, $00, $00, $00, $00

        ; Subroutine: Compare the cartridge header’s logo against
        ; a given memory location
Addr_0073:
        ld   hl,$011C           ;  0073  Start comparing halfway into the logo
Addr_0076:
        ld   a,[de]             ;  0076
        inc  de                 ;  0077
        cp   [hl]               ;  0078
        jr   nz,Addr_0082       ;  0079
        inc  hl                 ;  007B
        ld   a,l                ;  007C
        cp   a,$34              ;  007D  $xx34 = The first byte after the header logo
        jr   nz,Addr_0076       ;  007F
        ret                     ;  0081
Addr_0082:
        ld   a,$85              ;  0082  Compare failed!
        ret                     ;  0084

        ; $77 filler bytes
Addr_0085:
        db   $ff, $ff, $ff, $ff, $ff, $ff, $ff, $ff
        db   $ff, $ff, $ff, $ff, $ff, $ff, $ff, $ff
        db   $ff, $ff, $ff, $ff, $ff, $ff, $ff, $ff
        db   $ff, $ff, $ff, $ff, $ff, $ff, $ff, $ff
        db   $ff, $ff, $ff, $ff, $ff, $ff, $ff, $ff
        db   $ff, $ff, $ff, $ff, $ff, $ff, $ff, $ff
        db   $ff, $ff, $ff, $ff, $ff, $ff, $ff, $ff
        db   $ff, $ff, $ff, $ff, $ff, $ff, $ff, $ff
        db   $ff, $ff, $ff, $ff, $ff, $ff, $ff, $ff
        db   $ff, $ff, $ff, $ff, $ff, $ff, $ff, $ff
        db   $ff, $ff, $ff, $ff, $ff, $ff, $ff, $ff
        db   $ff, $ff, $ff, $ff, $ff, $ff, $ff, $ff
        db   $ff, $ff, $ff, $ff, $ff, $ff, $ff, $ff
        db   $ff, $ff, $ff, $ff, $ff, $ff, $ff, $ff
        db   $ff, $ff, $ff, $ff, $ff, $ff, $ff

        ; Disable the boot ROM and hand over control to the game cartridge.
Addr_00FC:
        ld   a,$01              ;  00FC Write to the ROM disable register
        ldh  [$FF50],a          ;  00FE
It’s mostly like a stripped down version of the original Nintendo bootstrap. It turns on the sound circuit even though it does not play any sound. Perhaps this is for compatibility with some game that expects it to be turned on on start-up. The boot ROM also clears the video RAM, sets the background palette and finally turns on the LCD circuit.
The boot ROM interestingly enough only stores a reference copy of the second half of the Nintendo logo, even though there’s plenty of unused space. So the first half of the logo could be incorrect and the program would still start. Incidentally, Gameboy Color has a similar bug where only the first half of the logo is checked, which has prompted some pirate publishers to get creative and make logo combinations like HotKid, Niutoude and Yiutoudz using the bottom half of the logo that they can control freely. Read more on Neofuji. It wouldn’t matter in this case anyway, as the logo isn’t shown on the screen, only checked.
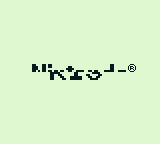
But what’s weirder is what the boot ROM does if the Nintendo logo check fails. It then does a second check, against an alternative logo that perhaps says KIS or RIS, simulated to the right for illustrative purposes. Again, the boot ROM only stores half the logo in this case as well, so there’s no way of getting the full logo without finding a matching game that contains the full logo in it header.
It may be checking specifically for a certain game by the same publisher. But why would the game have an alternative logo, when this logo is not shown on the Game Fighter, and would hang a genuine Gameboy? The only logical conclusion I can come to is that the game that this check was made for does a logo swap. Some examples of logo swaps (apart form the half logo hacks) can be found in the Neofuji post linked above. A logo swap works by switching in memory containing your own logo when the boot ROM copies the logo the into VRAM, and then switching back to the real logo when the check is done. This would normally fail on the Game Fighter, since it checks the logo much earlier than a real Gameboy.
But in the end, we may never know. If you have any clue which pirate publisher KIS/RIS/??? is please let me know!
Thanks to BennVenn for coming up with this method of accessing the boot ROM!
December 9th, 2014 at 11:09 am
Perhaps it’s KI3? Producing a full logo from half of a logo by mirroring it would be cute.
Not that I know what KI3 is any more than KIS.
December 9th, 2014 at 11:16 am
And the middle character may be a 1 (one). Thanks for the idea.
December 9th, 2014 at 10:13 pm
[...] http://blog.gg8.se/wordpress/2014/12/09/dumping-the-boot-rom-of-the-gameboy-clone-game-fighter/ [...]
December 11th, 2014 at 8:00 pm
[...] Game Boy, not much is known about these clones. [nitro2k01] wanted to learn more, so he used a clock-glitching technique to dump the device’s ROM and made some interesting discoveries about its copyright protection and boot process along the [...]
December 11th, 2014 at 11:18 pm
> This causes the CPU to glitch to jump to a random location. If you’re lucky, this allows you take control of the code execution and, again, dump the boot ROM.
Can you elaborate more on this? Is there any link or any piece of information you can provide for taking a deeper look at this technique?
December 11th, 2014 at 11:33 pm
Do you have the program you wrote to catch this and would you be willing to share it. It would be interesting to see.
December 11th, 2014 at 11:49 pm
e: This is a black box behavior to me. I’m not exactly sure what’s happening. But, as an attempt to explain it: Normally, the clock oscillator will generate a clean square way, with a 50% duty, so the clock signal will look like this: ‾|_|‾|_|‾|_|‾|_|‾|_ and the CPU will do a new action on each positive edge. Under these theoretical conditions, the CPU works perfectly. When you’re glitching the clock, various things can happen to it. You might create a clock pulse that varies in time or doesn’t fully reach the top of the cycle. This may cause an operation to fail. For example, the CPU has a circuit to to increment (add 1) to the program counter (PC) in order to read the next instruction. If the positive edge that is supposed to trigger this operation only reaches half of the maximum value, some transistors may no turn on, or turn on when they shouldn’t, and the calculation gives a different result than PC+1, and something other than the next operation is read.
The Xbox360 was hacked in a similar way a couple of years ago. In that case the exploit consisted of giving a short reset pulse at a strategic time in order to make a certain instruction fail. You can read about that here or by googling Xbox360 reset glitch.
December 11th, 2014 at 11:50 pm
sleepy9090: Yes, I will release it in due time, but I first want to take the time to write a post describing exactly how the program works.
December 12th, 2014 at 12:00 am
Excellent that’s what I was hoping for. Thanks and great work.
December 12th, 2014 at 12:56 am
Very cool, i really enjoyed reading the article and I’ve spent the evening looking for more info on Glitching/Sideband attacks, GameBoy hacks and stuff.
I might get a GB from eBay, it’s a piece of history after all
December 12th, 2014 at 4:00 am
[...] Game Boy, not much is known about these clones. [nitro2k01] wanted to learn more, so he used a clock-glitching technique to dump the device’s ROM and made some interesting discoveries about its copyright protection and boot process along the [...]
December 12th, 2014 at 5:05 pm
[...] Blog de Nitro2k01 googletag.cmd.push(function() { googletag.display(’div-gpt-ad-1390837677209-8′); }); Comentar 0 Compartir 0 Tuitear 0 Compartir 0 Reacciones 0 [...]
December 12th, 2014 at 5:17 pm
[...] Blog de Nitro2k01 [...]
December 12th, 2014 at 6:24 pm
Maybe the logo says R13, and represents the bios revision.