![You suck at protoshop. No, you [i]really[/i] oo.](http://blog.gg8.se/images/you-suck-at-photoshop-you-really-do-your-awful.png)


Fun with a LED spotlight, a camera, my hand and some fruit
November 25th, 2011I recently bought an IKEA spotlight. (JANSJÖ Clamp spotlight, product number 80163192) For fun I tried cupping my hand around it in a dark room to make the light shine through my hand. I could see my own veins. Pretty cool. I used to this with flashlights as a kid, as well.
Of course, I felt the need to document it. But these pictures look considerably different from what I could see with my naked eye…

Untitled installation featuring Shitwave
October 18th, 2011An untitled collaboration between Simon Mattisson and Marcus Olsson. A Gameboy in a dark room is overclocked until it crashes. I’m almost getting Saw vibes from this. The Gameboy is modded by NeX and is actually being overclocked. The sound is produced by Shitwave.
Syncing monotribe to LSDj using the sync jack (no MIDI)
September 28th, 2011Monotribe has jacks on the back for sync in and out. The sync output outputs 15 ms 5V pulses, which can either be rising or falling. (There’s a setting for this.) The sync input can also trigger on either a positive or a negative edge. (There’s a setting for this as well.)
You can trigger this input from LSDj. There are two things to think about:
1) The signal from the headphone jack is too weak. You need a ProSound modded DMG with the volume turned all the way up. (Other models untested, may or may not work…)
2) The monotribe requires a single clean rising edge to trigger correctly. The pitfall when using LSDj is that for example a square way, or a sawtooth wave, or even the noise generator, will trigger multiple steps. For this reason, you cannot use the pulse channels for this without getting a lot of false triggers. But you can use either the wave channel or the noise channel with somewhat predictable results (almost no false triggers) using a couple of tricks.
In this video I’m showing you how. As you can see, the video also shows which buttons I were pressing at any one time in case anything is unclear. Below is an explanation for the things show in the video.
1) Using the wave channel
The idea of this method is to create a wave that doesn’t oscillate. Instead of a sawtooth wave or a sine wave, you have a constant voltage. The easiest way to do this is by creating a synth with zero volume and moving all samples to the top.
Select+B, right until everything is selected, up until the samples are at the top.
(After recording this I realized that an even easier way to do the same thing is to set the VSHIFT parameter to 80, but this is good exercise in using the wave editor.)
The instrument used needs to be a wave instrument and have PLAY set to MANUAL. At this point, the instrument hould be ready to use. Place a note on on each step in the sequencer where you want to trigger the monotribe.
2) Using the noise channel
The Gameboy noise channel actually doesn’t produce real noise, but pseudo-random noise by changing amplitude between 0 and 1 in ways that sound random to humans. The Gameboy allows you to control the pitch of the noise, and at very slow pitch settings, it can take a second between the changes. This can be to sync the monotribe by first turning on the sound quickly to trigger the sync function, and then turning it off again, so the noise channel’s oscillations won’t trigger any more steps after that.
The way to do this is by setting the shape to 54 and usinng a table that turns off the sound output with the O command. (Trust me, I’m a professional.) I also changed the envelope to F8 to get the maximum amplitude possible.
General instructions
Use either the wave method or the noise method, not both. Both methods should give you OK stability from 40 BPM to 255 BPM, but sometimes you’ll see glitches, especially if you adjust the tempo.
If you have an appropriate left/right splitter cable, you can pan the sync instrument to the left and all other instruments to the right, to get both sound and sync out of one Gameboy. If any sound instrument is panned to the sync channel, the monotribe will start rushing.
Always start the monotribe first (or stop/start it before you restart LSDj) if you want things in sync. Otherwise, it will start at the step where it received the last pulse before it stopped.
Even when following all instructions, it may happen that the monotribe misses a beat when you press play, in particular the first time you press play after turning on the Gameboy. If so, stop LSDj, stop/start the monotribe and try again.
Tip 1: Adding some swing
You can add some swing in LSDj, just like when using Korg’s iOS app SyncKontrol. Swing, or shuffle, basically means that you delay every second note to get a more natural and less straight feel.
For this, I’m using the groove function in LSDJ. Since I laid out the the sync notes as 1/8th notes, I need to make a groove pattern that is 4 steps for it to have any effect. This is an LSDj technique that doesn’t need the monotribe to work. Go here to learn how the groove function in LSDj works.
Tip 2: Using the noise channel as a random trigger source
If you want to get random trigger pulses that are not synced to the tempo, or anything else, you can create a noise instrument with a low shape value, just like in the noise example below. If you let it play, it will trigger the monotribe at seemingly random intervals.
If you have any questions or thoughts, ask below.
Wireless monotribe MIDI
September 10th, 2011Made by a Japanese person using the name air_variable. He’s using an XBee for wireless serial communication. This just gives you a serial line, which can be interfaced over USB. This is not real MIDI, but you can use a serial to MIDI converter for this. For example, BlipBox MIDI serial or Spikenzie Labs Serial MIDI. Or why not Korg’s (!) PCIF-NT driver, as suggested in Lady Ada’s MIDI Zigbee tutorial. There are even more serial MIDI converters if you use Google.
Source: air_variable posts tagged monotribe (Japanese)
Monotribe, MIDI and me
August 14th, 2011
Introduction
Voilà Korg monotribe, the successor to its little brother, the monotron. The Monotron is a cheap, squeeky, and easily moddable toy synth with an MS-10/20-like filter topology. It has a ribbon keyboard an audio oscillator, an LFO, a lowpass filter, and not much more. The monotron was an instant hit, and Korg released schematics for it to aid modders further.
When I heard about the monotribe, I had my doubts. Mostly that there’s only one pattern, which is 8 steps long. Well, there are 8 extra steps for the drums, as well as a “flux mode” which records your movements on the ribbon continuously. In that sense, it is limited, and is an instrument made to be played with your hands, rather than be programmed. But as it turned out, this was a design choice, and not a technical limitation. I can easily imagine why. They wanted it to seem as analog and playful as possible.
Same thing with MIDI. Officially, the monotribe doesn’t support MIDI. It does however offer a sync pulse output and input. This allows it to be synced to other monotribes, modular synthesizers or even Korg’s own virtual iMS-20/iElectribe, using a special sync app on a second iPhone/Pod/Pad. However, the lack of MIDI is still a slight limitation.
Read on…
500 infernal terror!
August 8th, 2011My webhost recently started moving their customers to their new generation of servers, running LiteSpeed. This has caused me some grief the last few hours. One of my sites consistently showed a “403 access denied” error, seemingly no matter what I tried to do to remedy the problem. With some hard trying, I managed to make it display a “404 not found” instead, still seemingly randomly.
It turns out there were two problems, both most likely caused by buggy interpretation of .htaccess files by LiteSpeed. The first problem came from these two lines:
Allow From All

Order Allow,Deny
As it turns out by experiment, LiteSpeed handles these statements differently from Apache. Apache will start off by making a list of all the applicable rules, and then evaluating them in the order specified in the Order statement. In this example, first all Allow rules will be evaluated, then all deny rules. If there are any matches, Deny will take precedence since it’s last in order. If there are no matches, Deny will also take precedence since it’s the second argument. Of course, in this case everyone will be allowed since there’s an Allow From All statement, unless there are matching Deny rules. This is well documented in the Apache manual and (hopefully) well understood by web developers.
LiteSpeed on the other hand is dependent on where statements are placed in the source code. In the above example, the Allow From all statement is ignored, or possibly overridden by some implicit form of Deny From all. Not really sure… Moving Allow From all to after the Order statement will make it work. Also, changing the Allow statement to something more specific, like Allow From 1.2.3.4 but still placing it before Order will suddenly make it trigger. Not sure what’s up with that. Perhaps the LiteSpeed authors are trying to make it work how they think people think it will work. Or maybe they’re trying to do some optimizations by trying to abort the evaluation of the file as early as possible. Or maybe they just don’t know how these rules are interpreted by Apache. In any case, fact of the matter is that it doesn’t work as it is supposed to.
The next problem is how LiteSpeed handles errors in .htaccess files. It seems like whatever you do, you can’t get a 500 internal error from LiteSpeed if your .htaccess rules are incorrect. Completely invalid rules will be ignored, whereas as they would give a 500 internal on Apache. Malformed rules will give you a 404 not found instead of a 500 internal error, making it difficult to pinpoint the exact error. I’m not sure if this is a “feature” of LiteSpeed so they can say that their server will never have internal errors, or if it’s a secondary error similar to the “Additionally, a 404 Not Found error was encountered while trying to use an ErrorDocument to handle the request” errors that you sometimes see on badly configured Apache servers.
The culprit this time was the following rule:
RewriteRule ^(.*)$ wiki/index.php?title=$1 [PT,L,QSA,B]
LiteSpeed apparently doesn’t support the B modifier (escape characters like & when building the query string) which caused the server to barf. However, since what I got was a 404 error, and not a 500, I thought the rule somehow rewrote the URI to something that didn’t exist. It was not until I replaced the B with a bunch of random characters that I understood what was going on.
All in all, all of this may not seem like a very tough nut to crack, but there’s more. For some reason, an index.html file had its permission mask set to 400, or r——–, which in UNIX persmission terms means that the file will only be readable by its owner, and not by users in the same group, or “anyone”. This was a placeholder page that the web host had put their, but I’m not sure how it got that permission mask.
When the rule works as it should, the root URL http://packetsofknowledge.se/ should be rewritten to the MediaWiki index.php. However, when I tried simply deleting/renaming my .htaccess, I still got a 403 because of the permissions of the index.html. However, since I hadn’t noticed that, I assumed at that point that the issue maybe wasn’t .htaccess related.
To summarize, when you have different error sources, the number of ways something can fail increases exponentially.
Why dead horizontal lines are harder to fix…
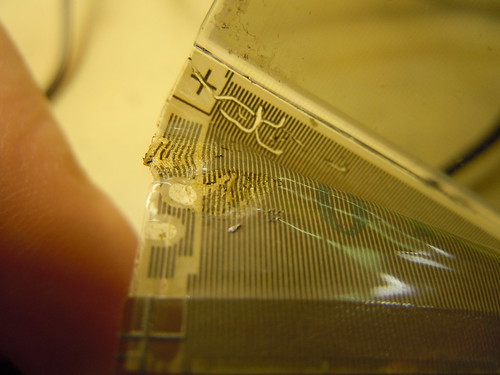
July 21st, 2011There’s a (relatively) well-known method of fixing dead lines on the DMG-01 (classic Gameboy) LCD screen which consists of dragging a hot soldering iron across the connection of the brown plastic connector with an epoxy blob, and the glass. The right spot in underneath where there’s normally a black rubber strip. This will reflow the glue, solder or whatever is used for the attachment, and the method can usually successfully fix dead vertical lines.

Sometimes people ask whether horizontal lines can be fixed as well. I’ve always assumed that the connector on the right side of the screen, which would be at fault if there are dead vertical lines, is basically identical, and that the only problem with fixing horizontal lines is the more awkward position of the connection — the “ribbon” is connected on the bottom side of the LCD glass, so you need to fit the soldering iron into a small corner without damaging anything.

However, the ribbon connector on the right side is different and more fragile. If you look at the top image, you’ll see a connector that looks brown. Technically speaking, this is called a flexible PCB (printed circuit board.) Just like on a regular, rigid PCB — like the display daughterboard itself — you have copper traces for connections and a green solder mask. The black blob in the middle is an integrated circuit, not unlike the chips you would see on any other circuit board, only that this one is hidden within a blob made of epoxy, and the circuit on the chip is connected directly to the copper traces, rather than using external pins soldered to a circuit board.
The right side connector has a similar flexible PCB, but the last stretch of the connection is made by a flimsy white plastic material which is easily damaged by the heat from a soldering iron. The actual connectors are not made of copper but possibly carbon or some other conductive material. My advice is, do not try to fix dead horizontal lines. You’ll likely just mess up the connector as seen below.
If the English language made any sense…
April 27th, 2011
“If the English language made any sense, a catastrophe would be an apostrophe with fur”
~Doug Larson
Simon Lundströms manga-dom och jakten på de friade bilderna
February 5th, 2011(Mixed language post. Swedish=blue left border. English=red left border. Warning! No hotlinking, unless you have a goatse fetish!)
Jag skulle kunna diskutera det totalt absurda i att lagen, med den goda föresikten att skydda barn, förbjuder tecknade bilder som inte föreställer ett faktiskt övergrepp, men det har redan gjorts på ett flertal ställen i den svenska bloggosfären. Så istället tänker jag försöka mig på att testa mina Google-skillz och stilla min nyfikenhet genom att försöka hitta de bilder som bedömdes ligga inom lagens råmärken.
I could discuss the absurd law, which basically creates a thought crime, but instead, I will try to still my curiosity and test my Google skills, to see if I can find the 12 images that were ruled to be legal under Swedish law.
Fyra bilder ansågs inte nå upp till lagens definition av “barn”: isen01.jpg, c_girl.jpg, SINO1S.JPG, SINO2S.JPG
Åtta bilder ansågs inte nå upp till lagens definition av “porr”: han.050.jpg, han.051.jpg, n09.jpg, tsurupeta3.jpg, 022x.jpg, CRSN0201.PNG och två filer vid namn _09.JPG. (Kanske två kopior av samma fil.)
Four pictures did not depict children, as defined by the law: isen01.jpg, c_girl.jpg, SINO1S.JPG, SINO2S.JPG
Eight pictures did not depict pornograhy, as defined by the law: han.050.jpg, han.051.jpg, n09.jpg, tsurupeta3.jpg, 022x.jpg, CRSN0201.PNG and two files named _09.JPG, possibly duplicates.
Module #4 - Magnus Danielson sawtooth phase shifter
January 31st, 2011I keep postponing writing the build log of these modules, but here’s the 4th module in my rack, a Magnus Danielson design sawtooth phase shifter which is really an extension of the sawtooth octave doubler design on the same page. Magnus created these schematics 10 years ago to be as simple as possible, and this particular one contains an error which you should fix if you want to build this module. You’ll have to figure out for yourself, though…
I also broke out the internal comparator, which could be used to make a PWM easily.
As always, here’s a video of me playing around with the module, with an oscilloscope so you can see the waveform. Please turn on 720p for slightly better audio quality. (Should already be on by default in this embedded player.) There’s a bunch of annotations throughout the video explaining what I’m doing.
The next module I’m planning to build… Will probably be a cool one, so stay tuned.